
Status
When you first log in to the Pathfinder Core PRO web page, you will be presented with the System Status page. This is the same web page displayed when clicking the System link in the navigation bar.
(12).png?sv=2026-02-06&spr=https&st=2026-07-21T12%3A18%3A04Z&se=2026-07-21T13%3A07%3A04Z&sr=c&sp=r&sig=KCp6yoZglhY%2BD8F9%2B1py5VeITtbtfgDyQm9qPOPxZ48%3D)
This screen is primarily informational outside of the licensing configuration fields. There are four sections:
Version Information
This shows which of the two Firmware Banks is currently active and the version of software running in that Bank.
Licensing
This shows the current license in the system and its capabilities.
System Status
This shows graphs representing the current CPU, memory, Ethernet utilization, and available disk space. The graphs are updated automatically every two seconds.
Downloads
This section provides download links to the online documentation.
System Configuration
Under the System heading in the navigation bar is a Configuration link. If you've already referenced the Quick Start Guide, you will have already been introduced to this page.
Access the web interface by typing in the IP address configured earlier in a web browser; an authentication window will appear; type the following values:
Username = Admin
Password = AdminSelect Sign In to load the Pathfinder Core PRO control panel
(13).png?sv=2026-02-06&spr=https&st=2026-07-21T12%3A18%3A04Z&se=2026-07-21T13%3A07%3A04Z&sr=c&sp=r&sig=KCp6yoZglhY%2BD8F9%2B1py5VeITtbtfgDyQm9qPOPxZ48%3D)
From the links in the left-hand navigation bar, click Configuration under the System heading
(12)(1)(1).png?sv=2026-02-06&spr=https&st=2026-07-21T12%3A18%3A04Z&se=2026-07-21T13%3A07%3A04Z&sr=c&sp=r&sig=KCp6yoZglhY%2BD8F9%2B1py5VeITtbtfgDyQm9qPOPxZ48%3D)
Next to Livewire Endpoint Discovery, click Start
(15)(1)(1).png?sv=2026-02-06&spr=https&st=2026-07-21T12%3A18%3A04Z&se=2026-07-21T13%3A07%3A04Z&sr=c&sp=r&sig=KCp6yoZglhY%2BD8F9%2B1py5VeITtbtfgDyQm9qPOPxZ48%3D)
When a new device is discovered, the system will add it to its device list and add any route points provided by the device into the audio and GPIO router. This is one of the first options you will use when configuring a new system as it is how you will discover the equipment that Pathfinder Core PRO can control.
When discovery is enabled, the button will say Stop instead of Start; clicking the button will stop any additional automatic discovery.
Important Note: Pathfinder Core PRO uses the IP address of a device as the unique identifier of that device within the system. If you change the IP address of a device, Pathfinder Core PRO will treat it as a new device. This is why we recommend setting up your basic Axia infrastructure first before introducing Pathfinder Core PRO to the mix.
Additional System Buttons
(4).png?sv=2026-02-06&spr=https&st=2026-07-21T12%3A18%3A04Z&se=2026-07-21T13%3A07%3A04Z&sr=c&sp=r&sig=KCp6yoZglhY%2BD8F9%2B1py5VeITtbtfgDyQm9qPOPxZ48%3D)
Button | Description |
|---|---|
Restart System | If you click the Reboot button, the system will ask for confirmation to make sure the button was not accidentally clicked, and will then reboot the system. |
Factory Default System | Clicking the Factory Default button will erase all existing configuration data and return the system to the way it was shipped from the factory. Multiple confirmations are required as there is no undo option for this action. It is highly recommended that you make a backup of your system and download it to your local computer before using this option. See the section of this manual on Backup and Restore for details. Select the Erase License File checkbox if you also want to erase the licensing. It is important to note that erasing the license file will also erase the base license, and a call to Axia support will be necessary to re-license the system. Licenses are not included in the backup file. |
Hostname | Displays the current hostname of the Pathfinder Core PRO. Click Edit to assign a new hostname to the system. Hostname changes require a restart to take effect. |
Advanced Options | This section is for use in consultation with Axia support only as it provides methods for changing certain system variable and functionality. Note: Advanced options require a restart to take effect and do not synchronize across the cluster so must be set on each node in the cluster if consistency on the setting is desired. |
Logout | Logs the current user out of the system and requests new login credentials. |
Network Configuration Options
Current IP address information is visible in the Network Configuration section of the System > Configuration page.
(14)(1).png?sv=2026-02-06&spr=https&st=2026-07-21T12%3A18%3A04Z&se=2026-07-21T13%3A07%3A04Z&sr=c&sp=r&sig=KCp6yoZglhY%2BD8F9%2B1py5VeITtbtfgDyQm9qPOPxZ48%3D)
Livewire and Office Configuration
System IP options can be edited using the front panel display or through the web GUI.
Click the Configure button to open the network interface’s Edit screen
(8).png?sv=2026-02-06&spr=https&st=2026-07-21T12%3A18%3A04Z&se=2026-07-21T13%3A07%3A04Z&sr=c&sp=r&sig=KCp6yoZglhY%2BD8F9%2B1py5VeITtbtfgDyQm9qPOPxZ48%3D)
Type the IP Address, Netmask, and Gateway values and click OK, or click Cancel to leave this dialog without making any changes
Important Note: Network interface changes will not take effect until you reboot the system. Therefore, after changing the IP options, you will notice that Network Configuration screen will show the changes in parenthesis and will sport a shiny new Reboot button.
(5).png?sv=2026-02-06&spr=https&st=2026-07-21T12%3A18%3A04Z&se=2026-07-21T13%3A07%3A04Z&sr=c&sp=r&sig=KCp6yoZglhY%2BD8F9%2B1py5VeITtbtfgDyQm9qPOPxZ48%3D)
DNS Servers Configuration
The DNS section lists the currently defined DNS servers.
With correctly configured DNS settings, the system can send emails to administrators and employees alerting them to network changes requiring attention. For example, you can send emails when critical sources or destinations such as air chains become silent. To do this, the system needs to be able to resolve email server names with the correct IP addresses to send the email through. The DNS entries can also be used when entering NTP server information. Talk to your network administrator if you are unsure of which DNS servers to use.
Click the DNS Server Configure button to open the Dns Entries dialog, allowing you to add, remove, and reorder DNS server entries
.png?sv=2026-02-06&spr=https&st=2026-07-21T12%3A18%3A04Z&se=2026-07-21T13%3A07%3A04Z&sr=c&sp=r&sig=KCp6yoZglhY%2BD8F9%2B1py5VeITtbtfgDyQm9qPOPxZ48%3D)
Click Add to add a new DNS server to the list and Remove to remove a DNS server entry
To move a DNS Server up or down in the priority list, select a DNS server entry and click the << or >> buttons
Click OK to save your changes or Cancel to leave the dialog without making any changes
Important Note: DNS changes do not require a reboot to become active.
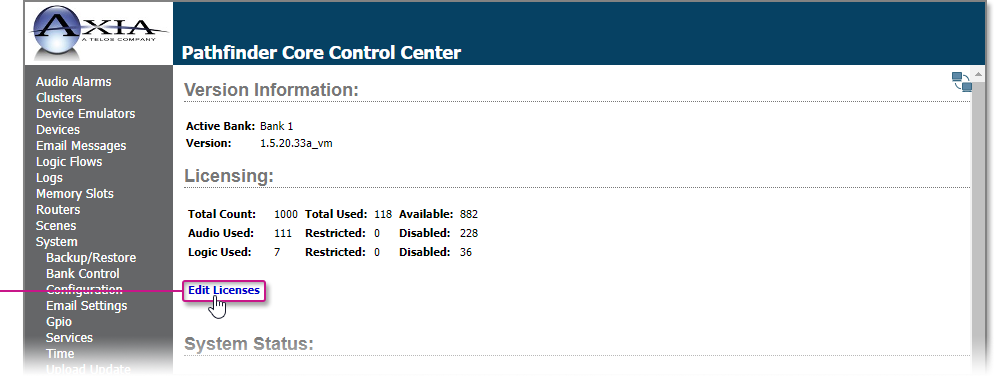
Licenses
Each Pathfinder Core PRO system includes a base license allowing a 1000 license point pool to be allocated between both Axia Audio Sources and Logic Flow endpoints.
Important Note: The licensing model changed with version 1.6 of Pathfinder Core PRO. In previous versions, the base license provided only 500 Axia Audio Sources and 500 Logic Flow endpoints, and add-on licenses would have to be applied to one or the other. Many customers found they needed more Axia Audio Source points but did not need as many Logic Flow points, resulting in the new licensing model defining the shared license point pool. We also added the new license types described below.
Virtual License Types
If you purchased a hardware-based Pathfinder Core PRO, the base license is pre‑installed. If you purchased a virtual machine license, there are three possible license types:
License Type | Points | Notes | |
|---|---|---|---|
1 | Pathfinder Core PRO VM | 1000 | The equivalent functionality to the hardware license |
2 | Pathfinder Core PRO VML | 300 | A lower license count and a correspondingly lower cost of entry |
3 | Pathfinder Core PRO VM Backup | 0 | Ideal for situations when adding a VM-based cluster node to a Pathfinder Core PRO cluster. This license will only work if clustered with another hardware or VM instance of Pathfinder Core PRO. In the case of a failure of the primary licensed Pathfinder Core PRO, the backup will continue to function as if it was the primary for up to 90 days while you repair the primary instance. If this 90-day limitation is not acceptable, normal full licenses may cluster as well without that restriction. |
Additional Licenses
Additional licenses to add functionality may be purchased through your Axia distributer, with each additional licenses providing either an additional 500 (the Pathfinder Core PRO Add-On 500) or 100 (the Pathfinder Core PRO Add-On 100) license points.
Add-on licenses are shared between the Pathfinder Core PRO units that are participating in a clustered system. This means that if you need a redundant Pathfinder Core PRO system that supports 1400 license points, you will need to purchase two Pathfinder Core PRO systems (each of which comes with a base license or backup license) and a single add-on license to add the additional 500 sources. The add-on license allows both systems in the cluster to mirror and synchronize the full 1400 license point functionality.
Important Note: Virtual sources and GPIO sources do not count against the license. Only Axia Audio Sources with enabled streams and Logic Flow endpoints are counted in the licensing. Additionally, Logic Flows which are dynamically created by the system during HTML5 panel binding and/or hardware mapping do not count against your licensing. If you have questions regarding the licensing model, please contact Axia support or your Axia distributor.
To view or add additional licenses, click the System heading on the navigation bar and then click the Edit Licenses link
.png)
The licensing page will display your base license information; it will also provide a list of your additional licenses
Click the New License line then type the new Request Code and License Key to add a new license
(12).png?sv=2026-02-06&spr=https&st=2026-07-21T12%3A18%3A04Z&se=2026-07-21T13%3A07%3A04Z&sr=c&sp=r&sig=KCp6yoZglhY%2BD8F9%2B1py5VeITtbtfgDyQm9qPOPxZ48%3D)
Finally, click Submit Changes to add the license to the system; license changes may require a reboot to become effective; click the Configuration link under System to find the reboot button
Backup/Restore
The Backup/Restore page presents a list of all backups in the system. If this is the first time using this page, there will probably not be any backups present in the system.
To take a new backup, or to upload a backup from your local computer back into the system, click the plus icon.
(17)(1)(1)(1)(1)(1)(1).png?sv=2026-02-06&spr=https&st=2026-07-21T12%3A18%3A04Z&se=2026-07-21T13%3A07%3A04Z&sr=c&sp=r&sig=KCp6yoZglhY%2BD8F9%2B1py5VeITtbtfgDyQm9qPOPxZ48%3D)
Taking Backups
To create a new backup, type a name for the backup, select whether you want logs and/or the IP address to be included in the backup, and then click Take. Click Cancel to exit the dialog without making any changes.
(21).png?sv=2026-02-06&spr=https&st=2026-07-21T12%3A18%3A04Z&se=2026-07-21T13%3A07%3A04Z&sr=c&sp=r&sig=KCp6yoZglhY%2BD8F9%2B1py5VeITtbtfgDyQm9qPOPxZ48%3D)
The backup will include any configuration files needed to return your system to its current state.
If logs are included, the backup will also include all system and application logs currently on the system. The log information can be very useful to Axia support if they are trying to assist in troubleshooting an issue, and it is likely they will ask you to take a backup including log files and send it to them.
If you intend to restore the backup on a different Pathfinder Core PRO, you may not wish to include IP addresses so the restore process does not overwrite the IP addresses of the other unit.
Important Note: After taking a new backup it is highly recommended that you click on the link to the backup file and download it to your local computer to store it in a safe location. Backups that live on the Pathfinder Core PRO system are not true backups because if the system or storage medium were to fail, both the system and the backups could be lost. Downloading a backup to your local system will also allow you to send the backup to support if necessary.
Backups are stored in the software Bank. When you move to a new software Bank, you will not be able to directly access the backups from the previous Bank. However, if the backup is saved to your local computer, you can easily upload it back into a new Bank if desired.
Uploading Backups
To restore your configuration to a new system, a factory default system, or a system that has had the desired backup removed from the system, click Choose File.
(21)(1).png?sv=2026-02-06&spr=https&st=2026-07-21T12%3A18%3A04Z&se=2026-07-21T13%3A07%3A04Z&sr=c&sp=r&sig=KCp6yoZglhY%2BD8F9%2B1py5VeITtbtfgDyQm9qPOPxZ48%3D)
Select a System Backup file on your local system, then click Upload. After the upload is complete, the backup will be available in the Backup/Restore list.
(15).png?sv=2026-02-06&spr=https&st=2026-07-21T12%3A18%3A04Z&se=2026-07-21T13%3A07%3A04Z&sr=c&sp=r&sig=KCp6yoZglhY%2BD8F9%2B1py5VeITtbtfgDyQm9qPOPxZ48%3D)
Removing Backups
The minus icon will delete a backup from the system.
.png?sv=2026-02-06&spr=https&st=2026-07-21T12%3A18%3A04Z&se=2026-07-21T13%3A07%3A04Z&sr=c&sp=r&sig=KCp6yoZglhY%2BD8F9%2B1py5VeITtbtfgDyQm9qPOPxZ48%3D)
Since there is limited space on the storage medium it is recommended to keep only a few backups on the system at a time.
Restoring Backups
Click the Restore link next to a stored backup. The system will request confirmation that you really wish to restore the system to that state.
.png?sv=2026-02-06&spr=https&st=2026-07-21T12%3A18%3A04Z&se=2026-07-21T13%3A07%3A04Z&sr=c&sp=r&sig=KCp6yoZglhY%2BD8F9%2B1py5VeITtbtfgDyQm9qPOPxZ48%3D)
Important Note: The restore function typically happens quickly, but keep in mind that the system will not be operational during the restore and reboot process.
Upload Update
One of the Pathfinder Core PRO Administrator’s most important tasks is periodic firmware updates. This project is undergoing a very active development lifecycle with many new features planned for future versions. That, in addition to fixes for any bugs reported to us by our users, will make occasional updates of the firmware in your Pathfinder Core PRO system necessary.
The system has two software Banks so that if there is a need to return to an earlier version, it will live in the preceding Bank. To upgrade your system:
Take a backup of your system as explained in the Taking Backups section above; we always recommend backing up your system before making any major change just to be safe; the backup process generates its own backup as well, but it never hurts to have another copy stored on your local computer
Download the new firmware version from the Axia Audio web site to your local computer; the file name extension will be .pfc_upd which stands for Pathfinder Core PRO update package; it is also a good idea to take a moment to scan the release notes to understand the changes between the version you are currently running and the version to which you will be upgrading
Select the Upload Update link under the System heading in the navigation bar; this page will display the Bank on which you are not currently running, as the update will always load to the inactive bank
Click Browse and select the file you downloaded from the Axia web site
(12)(1).png?sv=2026-02-06&spr=https&st=2026-07-21T12%3A18%3A04Z&se=2026-07-21T13%3A07%3A04Z&sr=c&sp=r&sig=KCp6yoZglhY%2BD8F9%2B1py5VeITtbtfgDyQm9qPOPxZ48%3D)
The File Upload bar will change to the name of the file which you have selected to upload and a status bar will appear with the Begin button; if the file is not correct for the type of system you have (for example, you attempt to install VM software to a Fanless Engine platform) a warning will appear
Click Begin to begin the updating process
(13)(1)(1)(1).png?sv=2026-02-06&spr=https&st=2026-07-21T12%3A18%3A04Z&se=2026-07-21T13%3A07%3A04Z&sr=c&sp=r&sig=KCp6yoZglhY%2BD8F9%2B1py5VeITtbtfgDyQm9qPOPxZ48%3D)
A new page will appear with a progress bar that presents stages along with some additional information regarding what is taking place at that point of the update process; the update may take several minutes to complete
Important Note: It is important to understand the status of the configuration files during an upgrade process. The configuration files for the system reside within the currently executing Bank. During the upgrade process, a backup of the configuration from the currently running Bank is automatically made. After the new software is written into the new Bank, the configuration is then restored into the new Bank so that when you boot into the new Bank it has the same configuration that is in the currently executing Bank. However, if you then boot into the new Bank and make changes to the configuration in the new Bank, those changes will not reside in the old Bank. If you wish to return to the old Bank and you have made changes to the configuration, you should back up the configuration on the new Bank, boot into the old Bank, and then restore the backup. This process is outlined in the section on Backup and Restore.
Once the update is complete, you should receive a Processing Succeeded message; because you are updating the Bank which is currently active, the system should continue to run even if there was an error with the update
(17).png?sv=2026-02-06&spr=https&st=2026-07-21T12%3A18%3A04Z&se=2026-07-21T13%3A07%3A04Z&sr=c&sp=r&sig=KCp6yoZglhY%2BD8F9%2B1py5VeITtbtfgDyQm9qPOPxZ48%3D)
If you receive an error message instead of Processing Succeeded, please contact Axia support
To boot into the updated Bank and start using the new software, click the Bank Control link in the navigation bar
Bank Control
Bank Control displays the software versions in both Banks of the system and offers control over the currently executing software revision Bank. Click the Bank Control link under the System heading in the navigation bar to view this page.
(21)(1)(1).png?sv=2026-02-06&spr=https&st=2026-07-21T12%3A18%3A04Z&se=2026-07-21T13%3A07%3A04Z&sr=c&sp=r&sig=KCp6yoZglhY%2BD8F9%2B1py5VeITtbtfgDyQm9qPOPxZ48%3D)
The Bank button can be used to select which Bank will be used on the next reboot. It also displays the currently selected Bank as the next Bank that will be active at reboot.
After changing the Bank that will be used on the next reboot, a Reboot button will appear on the page.
.png?sv=2026-02-06&spr=https&st=2026-07-21T12%3A18%3A04Z&se=2026-07-21T13%3A07%3A04Z&sr=c&sp=r&sig=KCp6yoZglhY%2BD8F9%2B1py5VeITtbtfgDyQm9qPOPxZ48%3D)
Clicking Reboot will reboot into the newly selected Bank.
The information tables display the software version in each Bank. An asterisk will be present next to the Bank that is currently executing.
Important Note: When you select a new Bank, the system creates a temporary mark in the system to boot into that Bank. After the system boots into the new Bank, that temporary mark is turned into a normal reboot setting so the newly selected Bank will be used on subsequent reboots. This is called "cementing the Bank". If something goes wrong with the upgrade and the Bank is unusable, the Bank does not get cemented and rebooting the system either automatically or by disconnecting power will cause the system to boot into the previously working Bank. The new Bank will only get cemented for future boots if it boots successfully.
This also means that after rebooting into a new Bank you should return to the Bank control web page to make sure the boot was successful and you are executing on the desired Bank. If the boot fails, it could fail back to the previous Bank and you will only know that by double-checking this page.
Important Note: We have occasionally seen some browsers try to cache the state of this page even though we have requested that it does not do so in the web page code. If you reboot and the executing asterisk does not change, try refreshing the web page. Some browsers have an extra button you can hold down while refreshing to force the web page to refresh rather than rely on the cache; for example, with Google Chrome, hold Shift+CTRL while clicking the refresh icon.
Configuration File Between Bank Changes
Since configuration files reside within the executing Bank, if you are switching to a different Bank the configuration may be different. It is always recommended to take a backup of your configuration before switching Banks, and then restore that configuration on the new Bank.
If you are switching Banks immediately after upgrading the firmware, then this backup and restore have been already completed as part of the upgrade process. Otherwise, it is recommended to review the backup and restore procedures earlier in this manual. Conversely, this also means if you make a mistake in the configuration in a new Bank, you can boot back into the old Bank to get to an older and successfully working configuration, though using backups and restores is a more efficient way of doing this.
Services
Click the Services link on the navigation bar to view the Services page.
.png?sv=2026-02-06&spr=https&st=2026-07-21T12%3A18%3A04Z&se=2026-07-21T13%3A07%3A04Z&sr=c&sp=r&sig=KCp6yoZglhY%2BD8F9%2B1py5VeITtbtfgDyQm9qPOPxZ48%3D)
This page will only be used in conjunction with Axia tech support, but it is worth discussing what this page represents. To make Pathfinder Core PRO as robust as possible, the system has a sophisticated watchdog process. This process monitors the state of each of the services in the system and is responsible for sending ping messages to each service to make sure they are still responsive at the application layer. If a service fails to respond within a certain period of time, the watchdog will restart the service. In a rare and catastrophic situation where the watchdog is not able to achieve proper responsiveness of a service, it might also restart all services or even reboot the system after enough subsequent failures.
This screen shows each service, when it was last started, and the most recent ping and response time. If you watch this screen you should notice the pings changing at approximately 5-second intervals.
In many ways, this page is equivalent to the Services control panel in a Windows machine.
Time
Click on the Time link under the System heading of the navigation bar to view the Time settings. The System Time configuration page allows you to define NTP servers, set the system’s time zone, and sync the current time to that of your local PC.
(22)(1).png?sv=2026-02-06&spr=https&st=2026-07-21T12%3A18%3A04Z&se=2026-07-21T13%3A07%3A04Z&sr=c&sp=r&sig=KCp6yoZglhY%2BD8F9%2B1py5VeITtbtfgDyQm9qPOPxZ48%3D)
Use the Current Timezone drop-down to select the correct time zone for the system.
Click Set time from PC to update Pathfinder Core PRO’s current time to that of your local PC.
Defining NTP servers in the Ntp servers list is recommended so that Pathfinder Core PRO can update its time automatically and always be as accurate as possible.
There are a number of reasons why it is important to keep Pathfinder Core PRO’s time accurate. The first is that the system has the ability to define events that happen at specific dates and times. Those events will, of course, fire at incorrect times if the system’s time is not up to date. Additionally, log files use the system’s time settings to keep track of when changes happen.
Finally, proper cluster synchronization relies on date and time settings to determine whether a specific piece of information is more up-to-date on one system or another and therefore whether synchronization of that piece of information needs to take place. Talk to your network administrator if you have questions about which NTP servers to use.
Email Settings
In order to send emails from Logic Flows, the server parameters must first be defined in the system in order to let Pathfinder Core PRO know which email server to use to send email messages. Under the System section of the navigation bar, click the Email Settings link.
.png?sv=2026-02-06&spr=https&st=2026-07-21T12%3A18%3A04Z&se=2026-07-21T13%3A07%3A04Z&sr=c&sp=r&sig=KCp6yoZglhY%2BD8F9%2B1py5VeITtbtfgDyQm9qPOPxZ48%3D)
These settings are like those used by any other email client application.
(22).png?sv=2026-02-06&spr=https&st=2026-07-21T12%3A18%3A04Z&se=2026-07-21T13%3A07%3A04Z&sr=c&sp=r&sig=KCp6yoZglhY%2BD8F9%2B1py5VeITtbtfgDyQm9qPOPxZ48%3D)
Field | Notes |
|---|---|
Mail Server | Type the name of your mail server. |
Port | Type the port number required by your mail server. Ports 25 and 587 are commonly used by SMTP mail servers. Check with your administrator or your hosting service provider to determine the correct Port setting. |
Send User Name | Type the user name associated with your account on your mail server. See note below. |
Send Password | Type the password associated with your account on your mail server. See Important Note below. |
Send From Address | Type the email address that will be included in the outgoing message’s Send From field. |
Ignore Certificate Errors | If you are using SSL encryption and the SSL/TLS certificate chain provided by the host is not in Pathfinder Core PRO’s trusted list, the message will not be sent and an error will be generated. Checking this option allows the system to use SSL encryption but ignore the SSL certificate error. |
Use SSL/TSL | Check this option to use SSL encryption. |
Critical Event Email Address | Type the email address of the administrator who should receive all emails generated by critical events such as a system restart or a service failure. |
Important Note: While most servers require authentication, some provide security based on the source IP address rather than user credentials. Using a blank username and password will cause Pathfinder Core PRO to skip including any credentials in the email sends. After applying a blank password, the field will most likely show a series of stars, but this does not indicate the presence of a password. In addition to masking the characters of a password, this field also masks the length of the password for security reasons. Therefore, even a blank password will display a constant number of stars in the field after the password has been applied.
Once you have the parameters configured correctly, click Apply Changes to store them to the system. This button must be clicked before Send Test Email will use the new settings.
Use the Send Test Email button to generate a test email. The page will ask for a destination email address and will then attempt to send the message. Any errors will be reported. Once you can successfully send test emails, you are ready to create messages that may be used by Pathfinder Core PRO’s event system, Logic Flows.
Go to the Email Messages section of this manual for more details about creating email messages determine when those messages are sent.
Security
The Security section allows a system administer to manage SSL/TLS certificates, whether services are enabled and exposed to the outside world, whether their communications should be encrypted, as well as alternate authentication methods.
.png?sv=2026-02-06&spr=https&st=2026-07-21T12%3A18%3A04Z&se=2026-07-21T13%3A07%3A04Z&sr=c&sp=r&sig=KCp6yoZglhY%2BD8F9%2B1py5VeITtbtfgDyQm9qPOPxZ48%3D)
On Certificates
For customers wishing to encrypt browser and other communication traffic, the security section of Pathfinder Core PRO makes this possible. However, this encryption is based on certificates and a good understanding of certificate based encryption and the corresponding trust relationships are critical to making this work correctly. Throughout the security discussions below we will be discussing several different types of security certificates which may or may not be needed depending on which encryption options you choose to enable. These different types of certificates include:
Self Signed Certificates: These are the default certificates created when enabling https. These present a public certificate to browsers attempting to connect to PathfinderCore PRO, and are used in the subsequent encryption of the traffic. However, since self signed certificates are not signed by a trusted authority, browsers will not by default trust the certificate and will therefore present a warning that you will have to click through in order to access the system's web pages. It is also possible to add a PathfinderCore PRO installation's self signed certificate to a browser's trust list, and that browser will from then on trust that PathfinderCore PRO installation.
Publicly signed certificates: Pathfinder allows you to generate a certificate signing request which can be taken to a publicly trusted certificate authority such as Let's Encrypt to get a trusted certificate. This solves the browser warning issue. However, you can usually only get a publicly signed certificate if you are using public IP addresses. Therefore, if your PathfinderCore PRO is not accessible via a public DNS/IP address, then this option will not be available.
Internally signed CA certificates: An option to the publicly signed certificate is to set up your own internal certificate authority. If you are in an Active Directory domain, you can add the certificate authority role to your Active Directory server. Then you can sign your certificates using the Microsoft CA and any computer in the network that trusts the Microsoft CA will also trust certificates signed by that CA. This allows you to use internal private IP addresses and DNS and still present certificates that the browsers in your network will trust.
Root Certificates: These are certificates that Pathfinder trusts as authorities or just as trusted certificates. While the certificates above are presented to browsers trying to access PathfinderCore PRO, root certificates are used when Pathfinder tries to access other systems using encrypted traffic. For example, if PathfinderCore PRO tries to authenticate with an LDAP server using encrypted traffic, Pathfinder needs to trust the certificate presented by the LDAP server before the communication can take place. Also if encryption is added for clustering communications, all servers in the cluster must trust each other's public certificates. In the case of publicly signed certificates, PathfinderCore PRO includes the Mozilla public authorities. In the case of internal CAs, you need to add the public root certificate of that CA to Pathfinder's root CA list to trust certificates that CA signs. And lastly it is possible to simply add a self-signed certificate to the trusted list.
Much more will be presented in the sections below as we cover various encryption methods, but a good understanding of encryption and certificates is necessary to correctly enable and use some of these features. It is also important to note that certificates have a time limit built in, and so must be renewed periodically. The length of time a certificate is valid for depends on the certificate provider and the type of the certificate, but one to three years is usually the maximum. You can create much longer times with a self-signed certificate or by managing the options in a private certificate authority.
Web Server
The web server option allows you to switch between http and https. The https option will encrypt all traffic between the browser and PathfinderCore PRO. Enabling the https setting will forward any attempts to access the device using http to https instead.
https requires an ssl/tls certificate in order to function. By default there is an automatically generated self-signed certificate. Because self-signed certificates are not issued by a trusted authority, this means you will be presented with an insecure message from the browser.
.png?sv=2026-02-06&spr=https&st=2026-07-21T12%3A18%3A04Z&se=2026-07-21T13%3A07%3A04Z&sr=c&sp=r&sig=KCp6yoZglhY%2BD8F9%2B1py5VeITtbtfgDyQm9qPOPxZ48%3D)
Clicking on advanced and proceed link will let you get past the warning and allow access to the system while still using encryption for the data between the browser and PathfinderCore PRO. There are several alternatives for eliminating the browser warning. The first is to add the certificate as a trusted certificate to the browser on each system that needs to access that instance of PathfinderCore PRO. This may be simplified in an Active Directory domain by distributing it using a group policy. Alternatively, you can upload your own certificate into the system by clicking the manage certificates link.
.png?sv=2026-02-06&spr=https&st=2026-07-21T12%3A18%3A04Z&se=2026-07-21T13%3A07%3A04Z&sr=c&sp=r&sig=KCp6yoZglhY%2BD8F9%2B1py5VeITtbtfgDyQm9qPOPxZ48%3D)
Click on the Update link for the web server certificate.
.png?sv=2026-02-06&spr=https&st=2026-07-21T12%3A18%3A04Z&se=2026-07-21T13%3A07%3A04Z&sr=c&sp=r&sig=KCp6yoZglhY%2BD8F9%2B1py5VeITtbtfgDyQm9qPOPxZ48%3D)
This will display the current parameters of the certificate used for the web server. To generate a new one, click on the Request Cert button. This will present a view of the configuration file settings needed to generate a certificate request.
.png?sv=2026-02-06&spr=https&st=2026-07-21T12%3A18%3A04Z&se=2026-07-21T13%3A07%3A04Z&sr=c&sp=r&sig=KCp6yoZglhY%2BD8F9%2B1py5VeITtbtfgDyQm9qPOPxZ48%3D)
By default the settings will include the local IP addresses in the alt_names section. You will need to add any other DNS names or external IP addresses which will be used to access PathfinderCore PRO into the configuration. If you have been manipulating this data and wish to return it to a factory default setting, clicking the “Reset Csr Data To Default” to reset the data.
It is important to understand that most public certificate providers such as Let’s Encrypt only allow publicly verifiable IP addresses and DNS names.
Click the Request Cert button in order to generate a signing request file based on these settings and PathfinderCore PRO’s private key.
Note: This will directly modify the signing request data. Validation of correct data structure is limited at this point in time.
After the request is generated you will be returned to the Current Certificate screen, but now the view Request and Fill Request buttons will be available. Click the View request to see the certificate request data that has been generated.
Copy this data into your certificate authority’s tools for generating a signed certificate.
Important notes for Microsoft CAs: If you are using an internal Microsoft certificate authority, each signing request requires an additional field which is not standard to most other signing requests. Specifically it requires you to define a template. To do this copy the certificate request into notepad, save it as a file like webserver.req and then move it to the Microsoft Server. Accessing the Pathfinder Core PRO web pages directly from the CA server may require installing a compatible browser on the server or loosening the browser restrictions to allow the web socket traffic. Or you can save the data using a windows 10 machine and move the files to and from the certificate server. Then open a command prompt on the Microsoft CA and type:
certreq -attrib "CertificateTemplate:WebServer"
This will launch Microsoft’s certificate signer using the WebServer template. The signer will ask you to select the certificate signing request file. It will then ask you to select the certificate authority to use for the signing.
Finally, it will then sign the file and ask you to store the signed certificate to a new file. For example you could save it as test.cer.
Whether you sign your request with a Microsoft Certificate Authority or some other CA, the final step is to click on the FillRequest button in PathfinderCore PRO, and paste the contents of the new certificate into the Signed Certificate Data field.
Clicking apply will then go through a process of validating and storing the certificate, restarting the web server and then returning to the security web page.
It is important to understand that using certificates signed by an authority other than an official public authority will still display as invalid in browsers unless that authority has been trusted on the corresponding machines. For example, if you sign the certificate using a Microsoft CA, it is assumed that you are also pushing the Microsoft root CA as a trusted root certificate to the client computers on your network.
The update web server certificate dialog also includes a Regen Self Signed button.
.png?sv=2026-02-06&spr=https&st=2026-07-21T12%3A18%3A04Z&se=2026-07-21T13%3A07%3A04Z&sr=c&sp=r&sig=KCp6yoZglhY%2BD8F9%2B1py5VeITtbtfgDyQm9qPOPxZ48%3D)
Clicking this button will issue a warning and then will remove any custom web server https certificate and generate a new self-signed certificate. Note that this will also generate a new private key for this certificate.
SapV2 Raw (9600)
This option defines whether the unencrypted SapV2 port 9600 is available externally or only within the box (internal). Since internally some inter-process communications use this, the port must be available internally. However, this option will prevent it from being accessed from outside the box.
SapV2 TLS (9602)
This option will enable a version of the SapV2 port that is encrypted using TLS encryption. The port will use the same certificate that is used by the https web server encryption. We can provide a tool we have created for interacting with the encrypted version of SapV2 in a similar way to how putty interacts with the unencrypted version. Please review the section below on security and clustering for details on how this setting affects clustering communications.
Metering (9501)
This option allows the metering to be exposed externally or internally. If it is exposed internally only, it will still work for any web browser user interfaces built in PathfinderCore PRO that display metering. This is because those interfaces connect to the web server which then connects internally to this port. This only needs to be exposed externally if you are using a third party application with the metering service.
SSH
This option allow you to turn on and off the ssh port. Typically this port is only used for support to get into the underlying operating system when troubleshooting a problem. Disabling this except when support needs it will tighten the security of the system somewhat by removing the open port.
Device Passwords
The device passwords option will retain the passwords used for logging in to devices, the email password, and the clustering password in symmetrically encrypted or unencrypted form in the server storage. It is important to understand that once the passwords have been encrypted, you cannot downgrade to an older version of the software that does not support this feature or restore a backup with the encrypted passwords to an older version of the software. If that is required you need to switch back to the decrypted form before downgrading. Changing this setting will kick off a function to encrypt and/or decrypt all instances of these passwords in the system.
Authentication
This option requires an optional External Authentication license. Beta testers may request a 90 day evaluation license for this feature. Once that license is installed on the system, this option will be available. It allows you to switch between using PathfinderCore PRO’s internal user list to authenticate users, and using an LDAP server to authenticate users. For example, enabling LDAP in an Active Directory server will allow you to use the users in your active directory domain as the login credentials to access PathfinderCore PRO. This allows a single point of user management rather than having to manage users in your Active Directory domain and your PathfinderCore PRO system.
It is critically important to understand how this feature works before trying to enable it or you may lock yourself out of the system. If that happens see the recovering from an authentication lockout section below.
After enabling LDAP, each login will send the username and password credentials to the LDAP server for authentication. If authentication is successful, Pathfinder will also request a list of the groups that the user is a member of. One of those groups must match a user security profile in PathfinderCore PRO for access to the system.
You can create a security profile in PathfinderCore PRO by adding a user with the name you will use for the group name in the LDAP server to Pathfinder. Then you configure that group's permissions in PathfinderCore PRO. While creating the user in Pathfinder you will have to add a password, but the password will not be used when in LDAP mode. For example, if your LDAP group name is PcpAdmin, then you need to create a PathfinderCore PRO user with the name PcpAdmin and configure the correct permissions for it. Then within Active Directory you can add users to the PcpAdmin group and when those users use their Active Directory user name and password to login to PathfinderCore PRO, they will have the rights of the PcpAdmin security user profile because they are a member of that group in Active Directory.
A user can pass correct credentials to LDAP, but not be a member of any group that is allowed to use PathfinderCore PRO and therefore be denied access. Therefore there are number of steps that should be taken before enabling LDAP authentication.
Make sure that the url you will use for the LDAP server is resolvable by the DNS servers specified in PathfinderCore PRO. Usually for Active Directory, this means adding the Active Directory servers as DNS servers in the PathfinderCore PRO DNS section.
Make sure you have created a group in the LDAP server that matches an Administrative user in PathfinderCore PRO.
For example, create a PcpAdmin user in PathfinderCore PRO that has Admin privileges and create a PcpAdmin group in an LDAP enabled Active Directory server. Warning: this is a case sensitive match.
Make sure you have at least one user in the LDAP server assigned to the administrative group.
If you are using Active Directory, make sure that LDAP is enabled on your Active Directory servers.
If you wish the LDAP communications to be encrypted, you need to have a public certificate in the LDAP server or have an internal certificate authority and import the correct root certificate into PathfinderCore PRO so that PathfinderCore PRO will trust the internal CA's certificate. See more below on this.
If these steps are not taken it is likely that switching to LDAP will cause you to get locked out of the system.
To configure LDAP, use the Authentication drop down to display the LDAP configuration settings.
An External Authentication license is required in order for the following items to be active.
Enter the proper parameters for your LDAP server.
X-Ldap-URL: comma delineated list of LDAP servers to try for authentication.
X-Ldap_BaseDN: The point in the domain structure that will be used to search for users.
X-Ldap-BindDN: The LDAP user that will be used to query the domain. It is highly recommended that this user have read only rights to the domain. It is the user that PathfinderCore PRO will use to access LDAP and authenticate other user credentials.
X-Ldap-BindPass: The password for the BindDN user.
X-Ldap-Starttls: Whether the LDAP communications should use TLS encryption which must be enabled on the LDAP server and have a proper certificate trust relationship configured.
The test button can be used to test your configuration options before applying them. Make sure you test before applying, as applying incorrect parameters can result in a lockout from the system. Generally we recommend getting LDAP working correctly without TLS encryption first, and then working through the TLS option. Clicking test will ask for a username and password which will then be passed to the LDAP authentication engine along with the entered parameters. A successful test means that the system was able to contact the LDAP server and use the bind paths and user to authenticate the user credentials supplied. It does not test for proper group membership. So a successful test can still result in a lockout if the authenticated user is not a member of a group that has a matching user profile in PathfinderCore PRO.
Once the test is working and you are sure that the users are a member of groups with matching security settings in the users section of PathfinderCore PRO, you can apply the changes. This will cause the system to present a new login screen which should then rely on LDAP user credentials for access to the system.
LDAP Urls
A comma delineated list may be used in the X-Ldap-URL section in order to try multiple LDAP servers. It is important to understand that the system will loop through the LDAP servers in order and attempt to bind to each one. If a bind is successful it will then try to authenticate a user. If the authentication fails, the system will not try the next server. The looping mechanism is only to achieve a successful bind. It is assumed that these are synchronized servers as far as the user data is concerned so a failed authentication on an active LDAP server equates to a failed authentication on all active LDAP servers. It is also important that each additional LDAP server connection that is tried adds delay to the authentication process. So it is preferable to make your most highly available server this first in the list.
LDAP Base DN
Sometimes it may be necessary when using LDAP authentication to query several different base domain name groups for a user. Note that it is preferable to find a base point that is common to both and issue one search instead of multiple, but in cases where this is necessary you can now specify multiple search paths by using the pipe character (|). For example:
cn=Users,dc=saitest,dc=localcn=Users,dc=saitest,dc=local | ou=Security Objects,dc=saitest,dc=localThe first option will only query the Users group. In the second case, the users group will be queried first and if no match is found, the Security Objects organizational unit will be queried.
.png?sv=2026-02-06&spr=https&st=2026-07-21T12%3A18%3A04Z&se=2026-07-21T13%3A07%3A04Z&sr=c&sp=r&sig=KCp6yoZglhY%2BD8F9%2B1py5VeITtbtfgDyQm9qPOPxZ48%3D)
Adding many base paths is not recommended as multiple queries can slow down the login process. Note that this pipe option only works for the X-Ldap-BaseDN field.
Warning: The pipe syntax in the BaseDN field will not be usable by previous versions of the software. So if you add this as part of the authentication process, you should remove it before downgrading to an earlier version.
It is also recommended to upgrade both nodes of a cluster before trying out this option.
LDAP and Starttls
If the Starttls option is set to true in the LDAP configuration, then the LDAP authentication engine will attempt to use a TLS encrypted path to access the LDAP server. In order for this to work, LDAPS (ssl/tls ldap) must be enabled in the LDAP server and a corresponding certificate must be in place. More importantly, the PathfinderCore PRO LDAP engine must trust the public certificate presented by the LDAP server. If your LDAP server has a publicly trusted certificate, this should happen naturally as PathfinderCore PRO includes the Mozilla trusted certificate root authorities. However, in many cases the LDAP server may be internal only and not have a trusted certificate. In this case it is recommended that the certificate be generated by an internal root authority and public certificate for that internal root be added to PathfinderCore PRO. For example, the following articles describe how to add a certificate authority role to an active directory server and set up a root certificate and LDAPS certificate in Active Directory.
https://pdhewaju.com.np/2017/03/02/configuring-secure-ldap-connection-server-2016/
https://bl.ocks.org/magnetikonline/0ccdabfec58eb1929c997d22e7341e45
Once this is set up, you then need to export the public portion only of the root certificate and add it into PathfinderCore PRO. Click on the security nav bar link, click on the manage certificates link, and then use the add button (+) to add a new trusted root certificate.
Once the root certificate is added, any certificates the active directory server creates based on that root certificate will be trusted by PathfinderCore PRO. You can add additional root certificates or remove root certificates, but you cannot edit them. If editing is required, remove the old certificate and then add the new one.
Once the trust relationship is configured, you can enable TLS in the LDAP configuration and then use the test button again to verify it is configured correctly before applying the changes.
Troubleshooting the LDAP configuration
While trying to get LDAP working, it is often useful to get hints as to why the LDAP test might be failing. These hints can be obtained from the sai-ldap-auth log. Click on the logs nav bar link and then the system logs link to find that log. Remember that if the log is open in the browser you need to refresh it to see new messages.
Recovering From an Authentication Lockout
If you incorrectly configure authentication and get locked out of the box, the front panel menu system now includes a Reset Security option.
.png?sv=2026-02-06&spr=https&st=2026-07-21T12%3A18%3A04Z&se=2026-07-21T13%3A07%3A04Z&sr=c&sp=r&sig=KCp6yoZglhY%2BD8F9%2B1py5VeITtbtfgDyQm9qPOPxZ48%3D)
To access it, tap enter to get to the menus, and then system to find the reset security option. This menu option will reset https to http, set the authentication back to internal, and recreate the Admin user with the default password.
Browser Anomalies
Occasionally after switching from http to https or the authentication method, you may observe missing graphics. This is a one time occurrence after the change based on cached images with different http/https locations. It can be resolved by exiting all instances of the browser and then opening the browser and logging back in again. Since these parameters are usually set up once and then not changed, this should not then re-occur.
Security Settings and Clustering
Most of the settings within the security section will not automatically sync as they are changed across the cluster. However care needs to be taken that they are set the same on all nodes of the cluster. The reason the sync does not automatically happen is that usually there are certificates that are involved which will be different depending on the host and so must be instantiated first.
It is particularly important that the Device Passwords setting is the same across the cluster. If this setting is different on different nodes, the synchronization of new devices may not obtain the correct ability to login to devices.
It is also important to understand the ramifications of the SapV2 Raw and SapV2 TLS settings when it comes to clustering. Clustering uses the SapV2 protocol for cluster synchronization and so either the unencrypted or encrypted port for SapV2 must be available for clustering synchronization to work. Additionally if the node has the encrypted port enabled, then clustering will only attempt to use the encrypted port for clustering communications. It is highly recommended that you set up your desired security settings and certificates on both servers before setting up the cluster.
If TLS encryption is enabled, the clustering synchronization must be configured to trust the certificates of other members of the cluster. If you are generating certificates using a trusted authority, no further action should be necessary. If you are generating certificates using an internal CA, you need to add the CA's public root certificate to all servers in the cluster, and then the communications will be trusted. If you are using self signed certificated, joining Server B to Server A for the first time when creating a cluster with TLS encryption enabled for SapV2, the join will likely fail and produce a certificate trust dialog.
Clicking Trust will add the public certificate from the other node to the trusted certificate store. Then attempting the join again should work, and after the restart and sync, server B should show the correct clustering state. However, if you then go back and refresh server A’s clustering tab, you will see that the cert state column has a failed link on the A server:
.png?sv=2026-02-06&spr=https&st=2026-07-21T12%3A18%3A04Z&se=2026-07-21T13%3A07%3A04Z&sr=c&sp=r&sig=KCp6yoZglhY%2BD8F9%2B1py5VeITtbtfgDyQm9qPOPxZ48%3D)
Clicking on the failed link will present the certificate trust dialog again and allow you to trust the certificate from the B server. It should then connect properly. Both servers should now trust each other. This may not be necessary if you are using certificates signed by a publicly trusted authority.
LDAP Token Synchronization
LDAP login tokens are synchronized across the cluster including their removal for inactivity. This means that a successful login to one node in the cluster assumes a successful login to all nodes in the cluster. It is important to note that a redirect due to failure from one server to another is still likely to fail or request a new login. This is because the browser will not forward the cookie and or authentication data to a different ip address or DNS address for security reasons. If you login to both servers in the browser, it will then failover correctly, but that is not ideal and gets lost after all instances of the browser are shut down. To solve this problem, see Floating Ips.