First-Time Setup
A new Pathfinder Core PRO has no password for its Admin user. Until one is set, every web address on the system opens the first-time setup page, and nobody can log in.
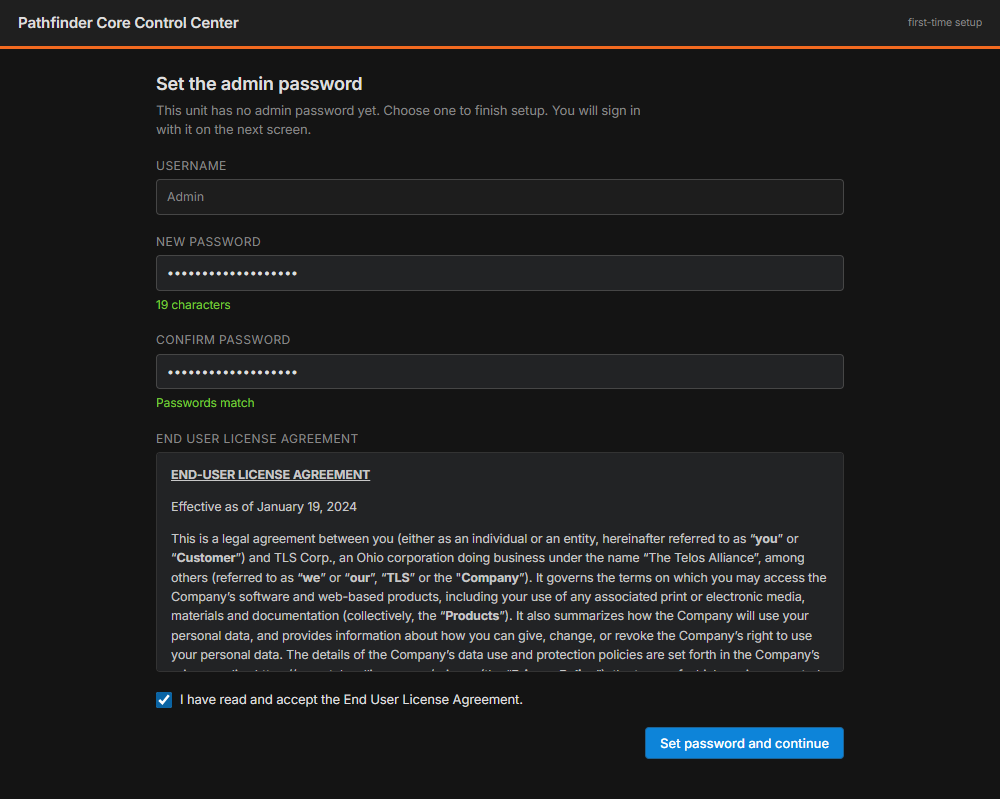
Type a password for the Admin user in New password, and again in Confirm password. The hints under the boxes show the length of the password and whether the two entries match.
Read the End User License Agreement and check I have read and accept the End User License Agreement.
Click Set password and continue. The browser then asks you to log in. Use the username Admin and the password you just set.
The setup page appears in these cases:
A new hardware unit, virtual machine or container is started for the first time.
The system has been returned to factory defaults with the Factory Default button.
Reset Security has been used from the front panel. See Recovering From an Authentication Lockout below.
> Note: The Admin password can be any length. Choose one that is hard to guess, and keep a record of it. If it is lost, use Reset Security on the front panel to choose a new one.
Using a Weak Password
The setup page accepts two passwords that are not recommended, and it warns you about each.
If you leave the password empty, the hint reads Empty — anyone can sign in without a password.
If you type the old default password, Admin, the Set password and continue button is replaced by a warning.
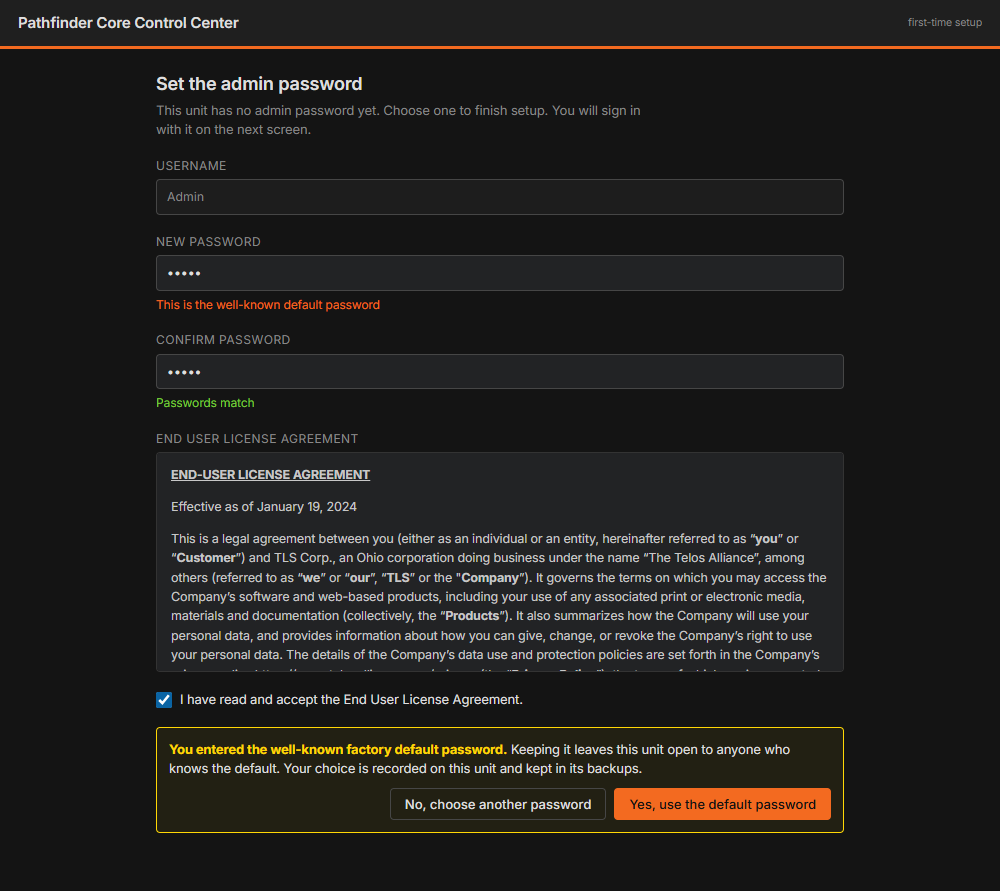
Click No, choose another password to clear the boxes and start again, or Yes, use the default password to continue with it. Either choice is recorded on the system and kept in its backups.
After Updating From an Earlier Version
Systems updated from an earlier version keep their users and passwords, so the first-time setup page does not appear. Two other checks are made instead.
The Admin password is still the default. If the Admin user still has the password Admin, every page opens the security update page after you log in.
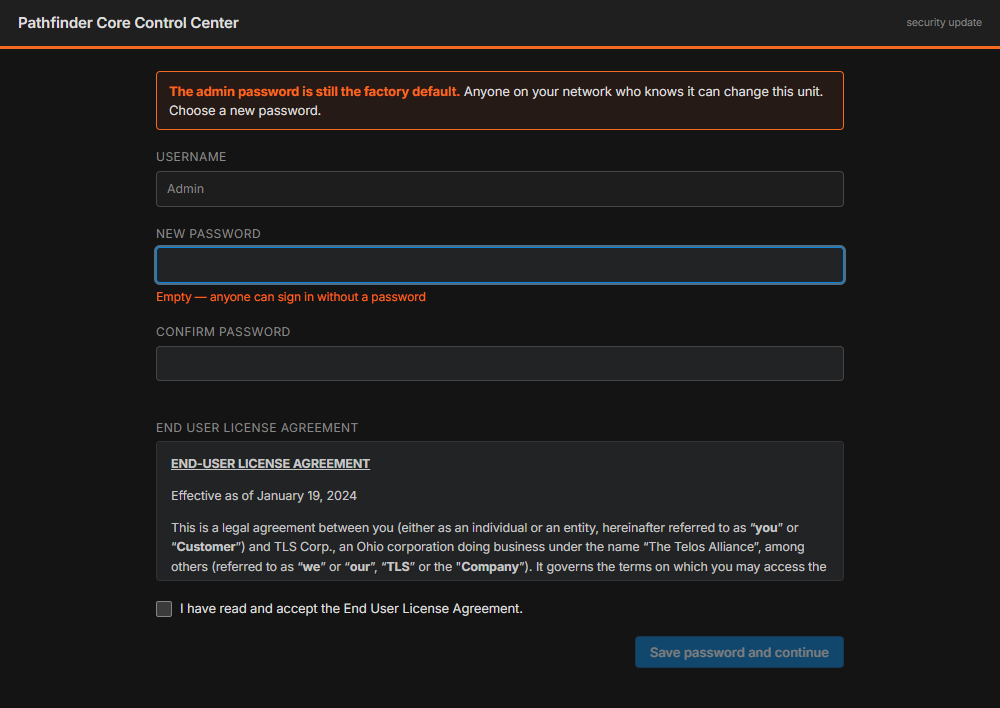
To change the password, type the new one in both boxes, accept the End User License Agreement if it is shown, and click Save password and continue. The browser asks you to log in again with the new password.
To keep the default, type Admin in both boxes and click Yes, keep the default password in the warning that appears. This choice is recorded on the system, and you are asked again after every software update.
The End User License Agreement has not been accepted. If the Admin password was already changed, the agreement opens on its own after you log in. The rest of the page cannot be used until it is accepted.
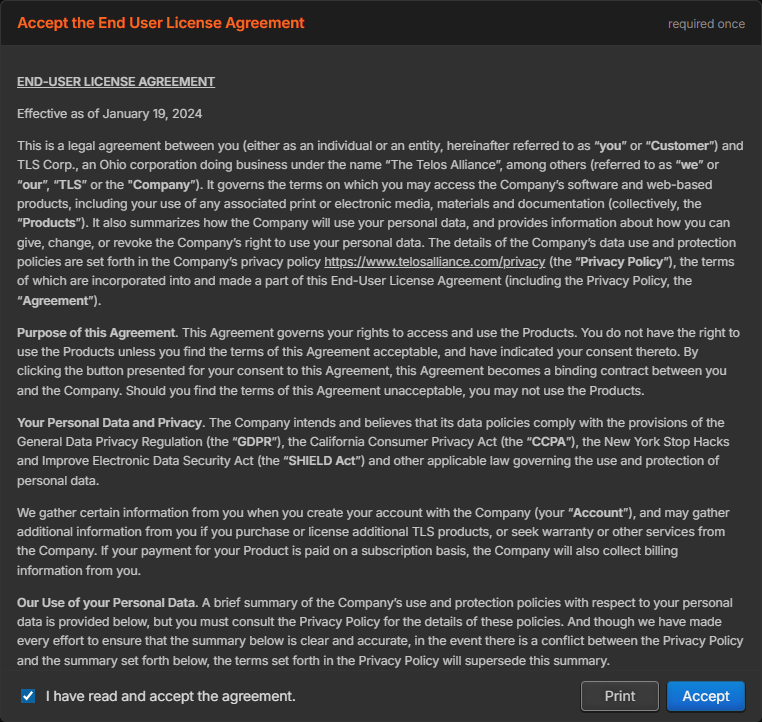
Check I have read and accept the agreement and click Accept. Print opens a copy for printing.
The agreement is accepted once for the system, not once for each user. It is only asked for again if a later software version carries a changed agreement.
Status
When you first log in to the Pathfinder Core PRO web page, the System Status page opens. This is the same page you see when you click the System link in the navigation bar.
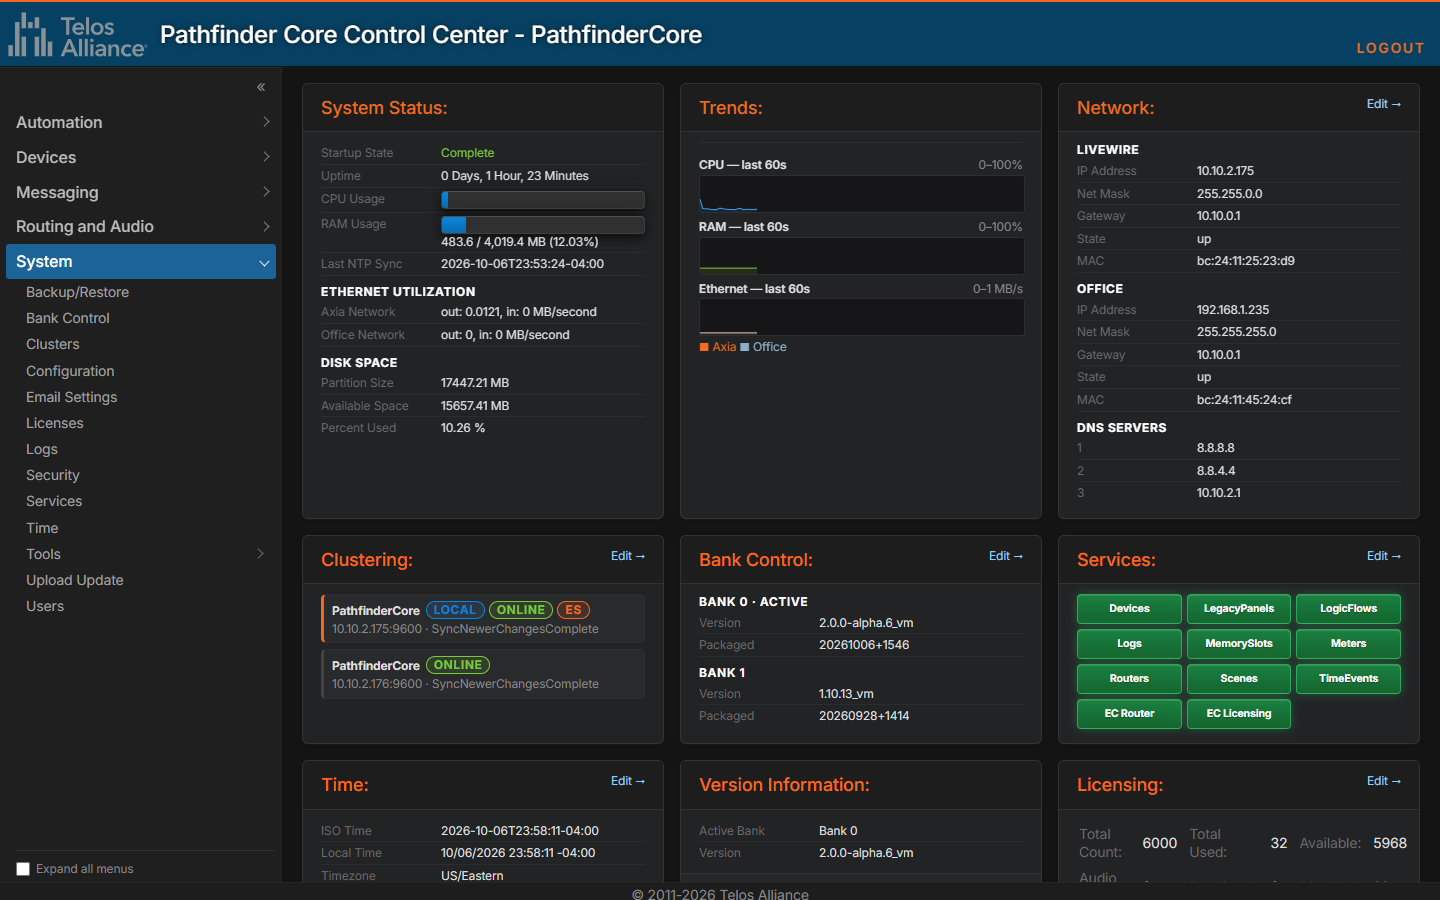
The page is a dashboard of cards. Cards with an Edit → link open the page where that part of the system is configured.
Card | Shows |
|---|---|
System Status | Startup State (the stage the system has reached while starting; Complete once every service is up), Uptime, CPU Usage, RAM Usage, Last NTP Sync, Ethernet utilization for the Axia (Livewire) and Office networks, and disk space. |
Trends | CPU, RAM and Ethernet use over the last 60 seconds. |
Network | The address, net mask, gateway, state and MAC address of the Livewire and Office interfaces, and the DNS servers. |
Clustering | Each node in the cluster with its address and synchronization state, marked LOCAL (this system), ONLINE and ES (running the event system); or Not Clustered. |
Bank Control | The software version in each Bank, and which Bank is active. |
Services | Each Pathfinder Core PRO service as a colored block: green while the service is running and responding. The EngineCore router and licensing services are included. |
Time | The system's time, time zone, and the last NTP synchronization. |
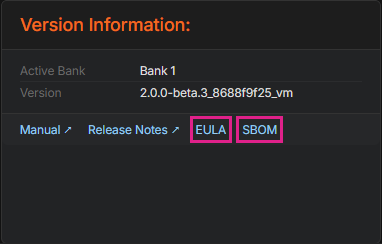
Version Information | Which of the two Firmware Banks is currently active and the version of software running in that Bank, with links to this manual, the release notes, the End User License Agreement (EULA) and the Software Bill of Materials (SBOM). |
Licensing | The current license in the system and its capabilities: total license points, points used and available, and how many audio and Logic Flow points are used, restricted or disabled. |
The values update automatically while the page is open.
Startup State shows the SystemStartupState property of Devices#0, which Logic Flows and SapV2 clients can also read. The system moves through these stages in order:
Stage | Meaning |
|---|---|
| The device manager is starting. |
| The saved configuration is being loaded. |
| The saved configuration has been loaded. |
| The services are starting. |
| The internal services are loaded. The remaining services are still starting. |
| Every service is loaded. |
| The system is contacting the other nodes in the cluster. |
| Every cluster node has been tried. |
| The Logic Flows are reading their starting values. |
| The Logic Flows have their starting values. |
| Startup is finished. |
If no NTP server is configured, administrators see a banner at the top of the page once startup is complete, as a reminder to set one up on the Time page.
EULA and SBOM
The Version Information card has two links for the software's legal and security records.
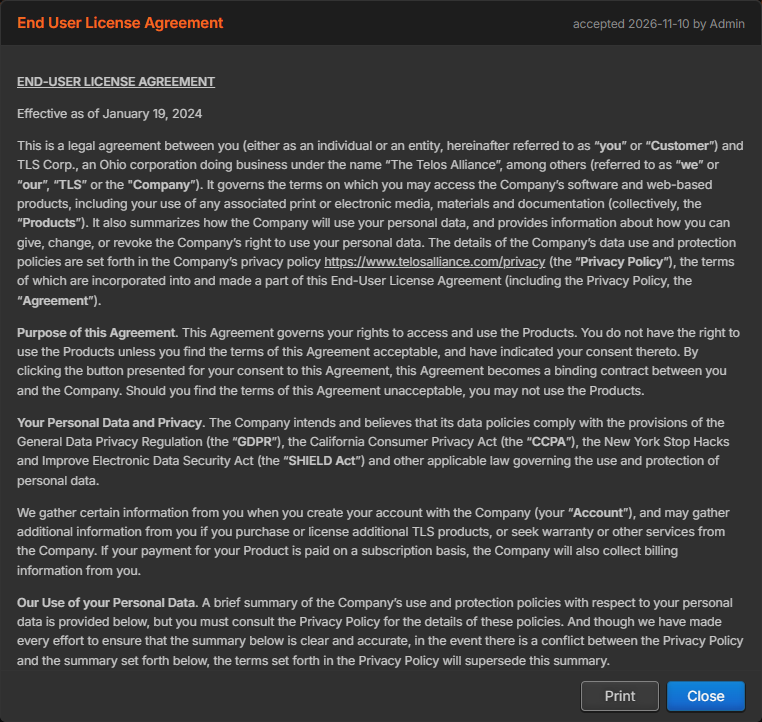
EULA opens the End User License Agreement that was accepted for this system. The top right corner of the window shows the date it was accepted and the user who accepted it. Print opens a copy for printing.
SBOM opens the Software Bill of Materials: the list of every software component built into this version, with each component's version and license. Security and compliance teams use it to check a system against published vulnerabilities and license requirements.
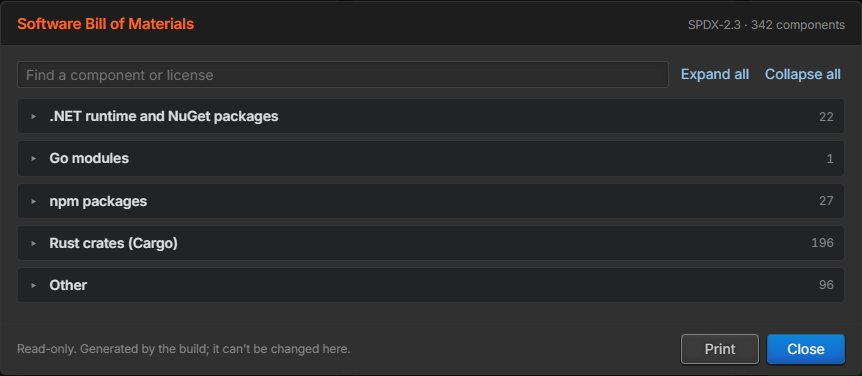
The top right corner shows the format of the list and the number of components. Components are grouped by where they come from, such as .NET runtime and NuGet packages or Rust crates (Cargo), with the number in each group at the right.
Click a group to open it and see its Component, Version and License columns. Expand all and Collapse all open and close every group.
Type in Find a component or license to show only the components that match. The search looks at names, versions and licenses, and each group then shows how many of its components match.
Print opens a copy of what is currently shown, with every group expanded.
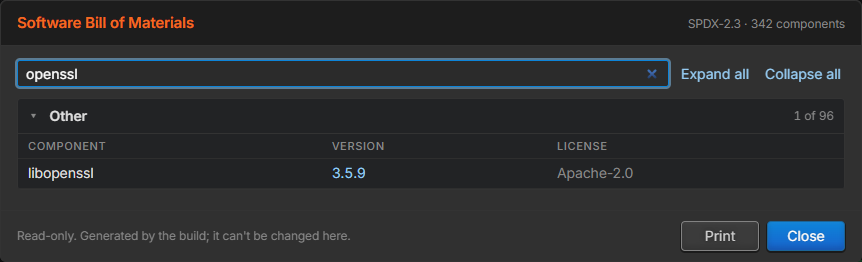
The list is created when the software is built and cannot be changed on the system. Each software version has its own list.
System Configuration
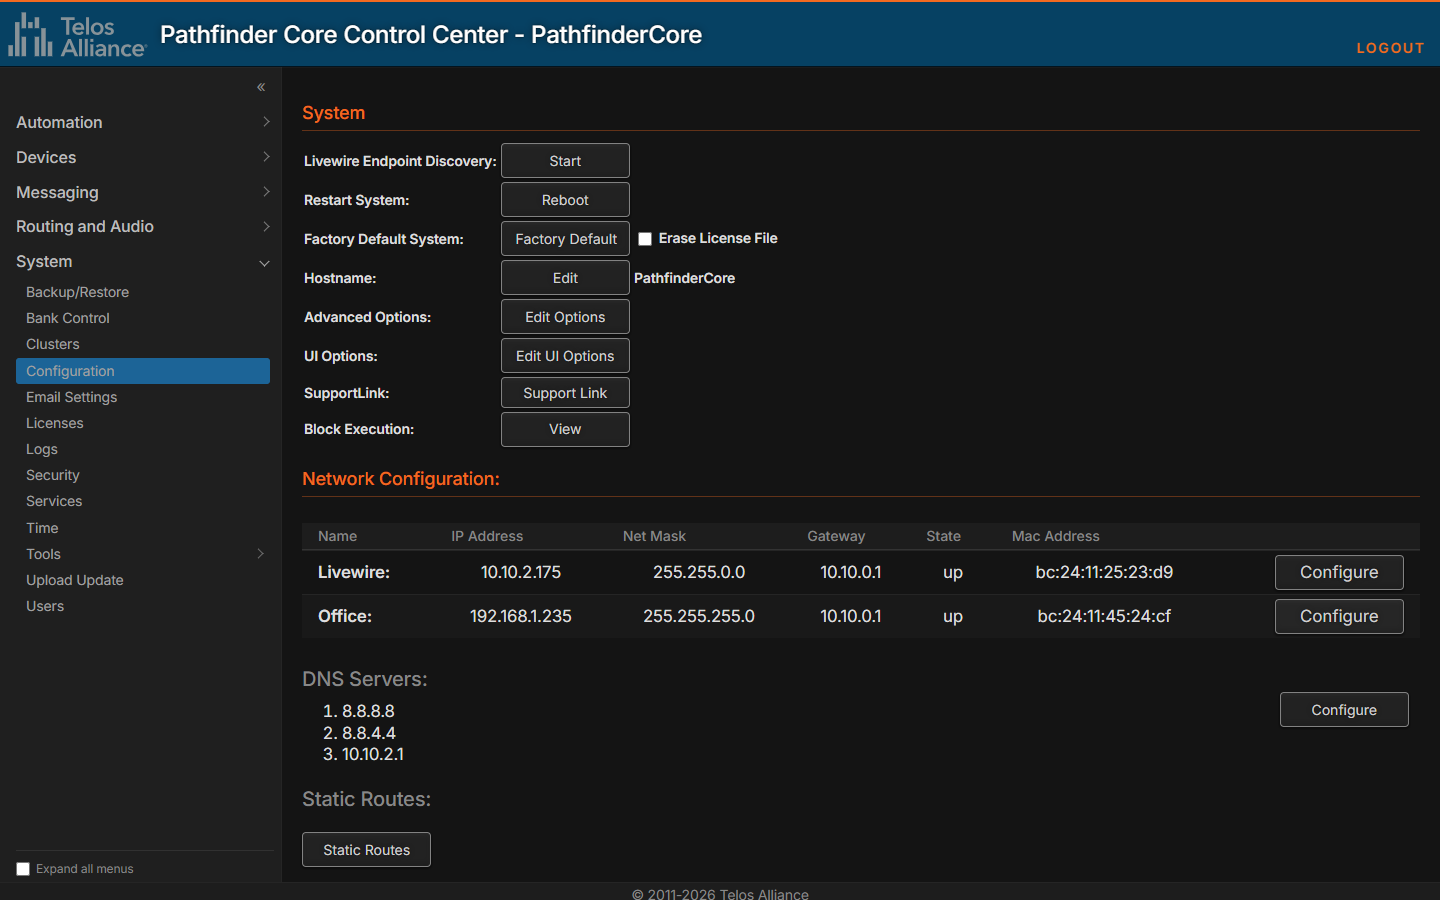
Under the System heading in the navigation bar is a Configuration link. If you have read the Quick Start Guide, you have already seen this page.
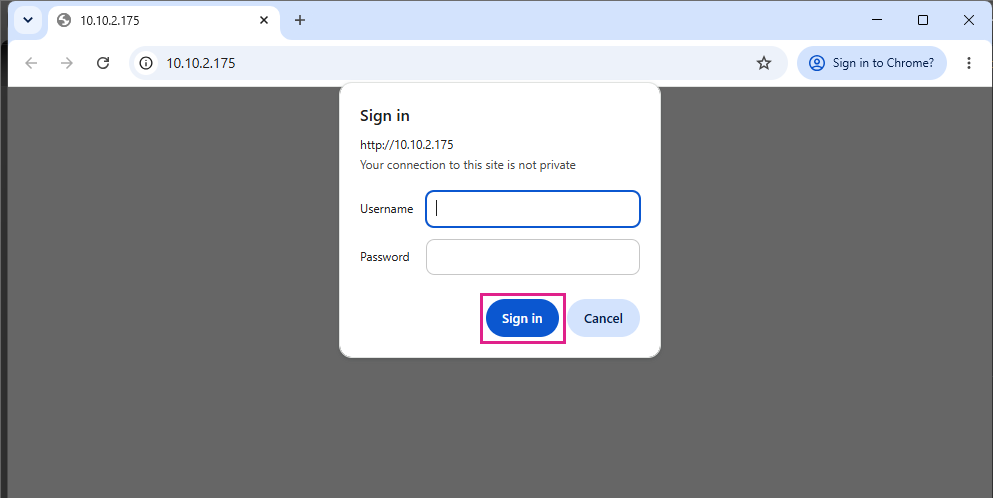
Type the IP address configured earlier into a web browser. When the authentication window appears, type these values: Username = Admin, Password = the password you set during first-time setup.
Select Sign in to load the Pathfinder Core PRO control panel.
From the links in the left-hand navigation bar, click Configuration under the System heading.
Next to Livewire Endpoint Discovery, click Start.
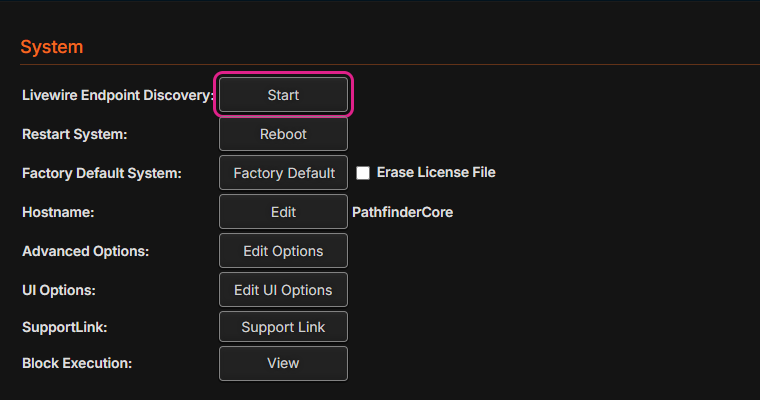
When a new device is discovered, the system adds it to its device list and adds any route points provided by the device to the audio and GPIO router. This is one of the first options you will use when configuring a new system, because it is how you discover the equipment that Pathfinder Core PRO can control.
When discovery is enabled, the button says Stop instead of Start. Click it to stop any further automatic discovery.
Important Note: Pathfinder Core PRO uses the IP address of a device as the unique identifier of that device within the system. If you change the IP address of a device, Pathfinder Core PRO will treat it as a new device. This is why we recommend setting up your basic Axia infrastructure before adding Pathfinder Core PRO.
Additional System Buttons
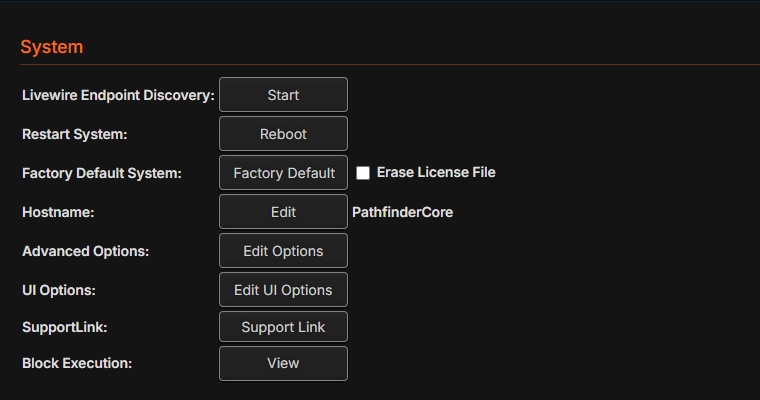
Button | Description |
|---|---|
Restart System | If you click the Reboot button, the system asks you to confirm, in case the button was clicked by accident, and then reboots. |
Factory Default System | Clicking the Factory Default button erases all existing configuration data and returns the system to the way it was shipped from the factory. Multiple confirmations are required because there is no undo option for this action. We highly recommend that you make a backup of your system and download it to your local computer before using this option. See the section of this manual on Backup and Restore for details. A factory default also removes every user and the Admin password, so the first-time setup page appears the next time you connect. Select the Erase License File checkbox if you also want to erase the licensing. Erasing the license file also erases the base license, and you will need to call Telos support to re-license the system. Licenses are not included in the backup file. |
Hostname | Displays the current hostname of the Pathfinder Core PRO. Click Edit to assign a new hostname to the system. Hostname changes require a restart to take effect. |
Advanced Options | Click Edit Options to open the Advanced Options page. See Advanced Options below. |
UI Options | Click Edit UI Options to change the banner and browser tab. See UI Options below. |
SupportLink | Click Support Link to turn SupportLink on or off. See SupportLink below. |
Block Execution | Click View to see and manage the execution blocks that stop parts of the event system from running. See Block Execution. |
Click LOGOUT at the top right of any page to log the current user out of the system and request new login credentials.
Advanced Options
Use this page only in consultation with Telos support, because it changes certain system variables and functionality.
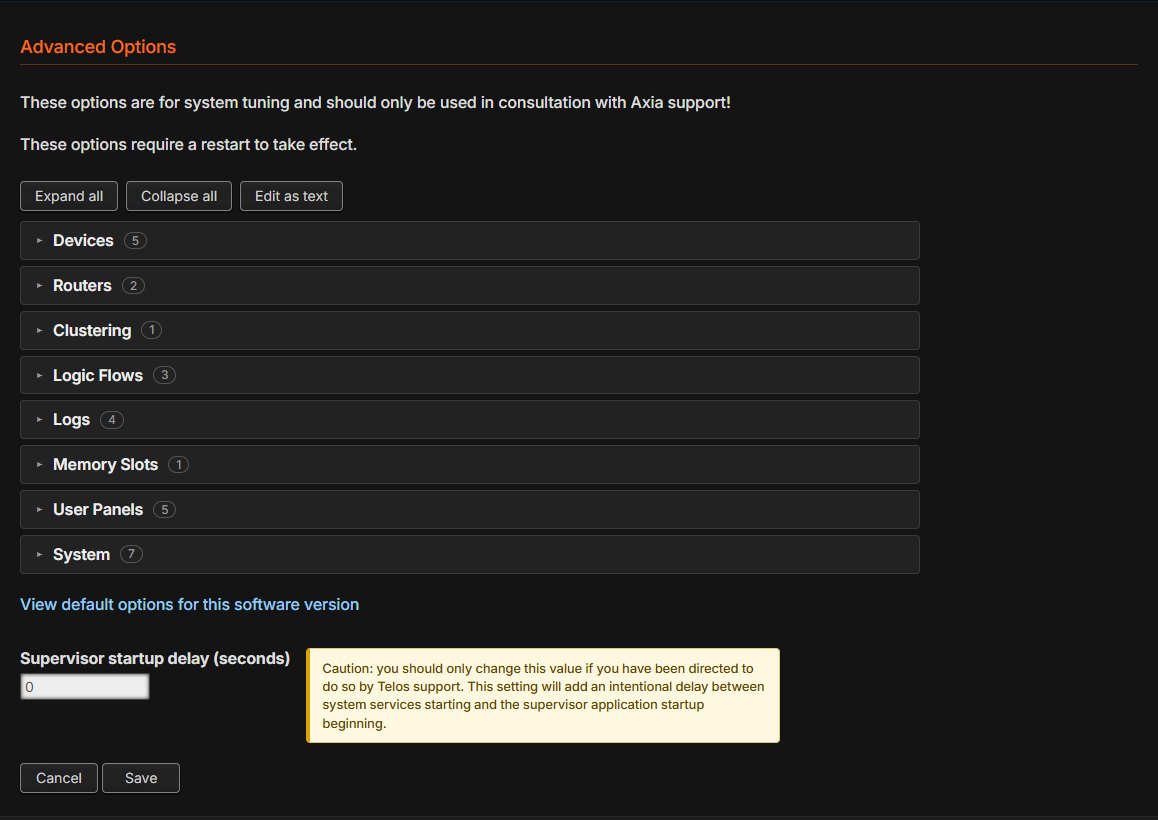
Options are grouped by the part of the system they affect (Devices, Routers, Clustering, Logic Flows, Logs, Memory Slots, User Panels, System). The number beside each group is how many options it holds. Click a group to open it, or use Expand all and Collapse all.
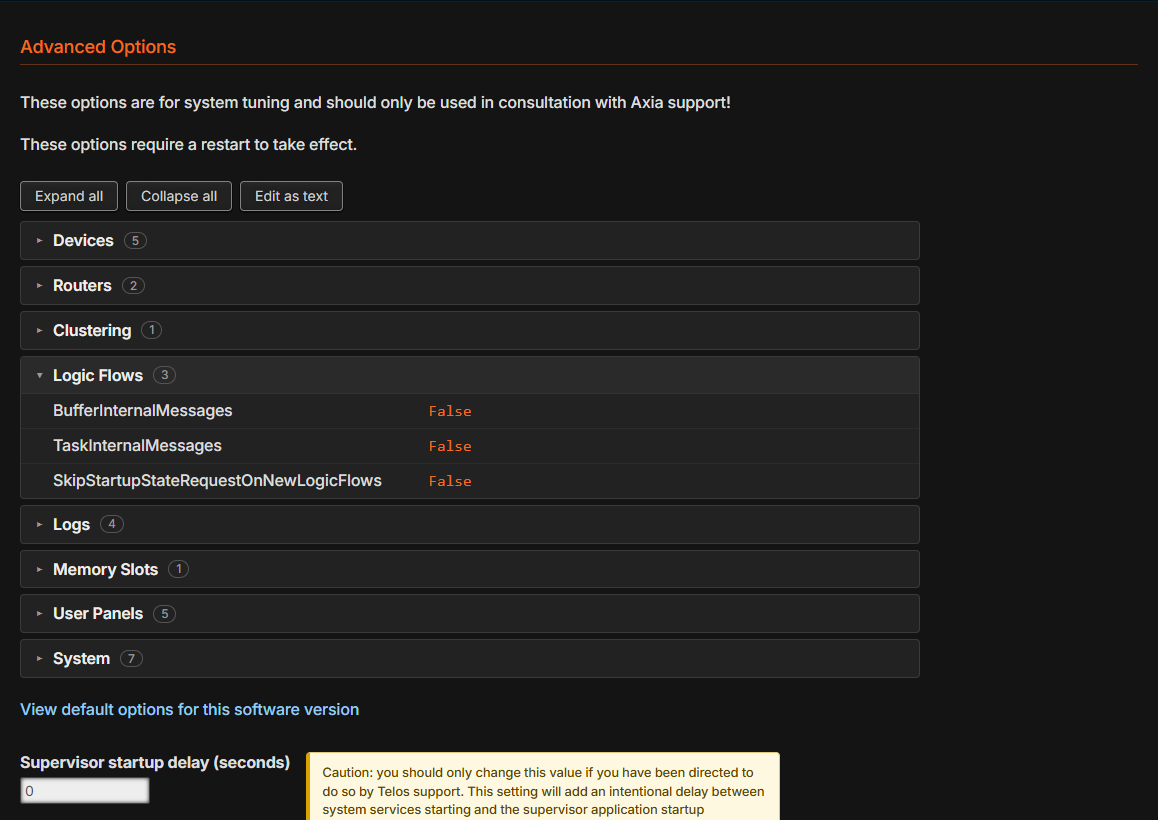
Click Edit as text to edit the options as plain text, as in earlier versions. View default options for this software version lists the defaults, so you can see which values have been changed.
The Supervisor startup delay (seconds) adds a pause between the system services starting and the supervisor application starting. Change it only when Telos support tells you to.
Click Save to store the options.
Note: Advanced options require a restart to take effect. They do not synchronize across the cluster, so set them on each node if you want the settings to match.
UI Options
UI Options change the banner at the top of every page and the text of the browser tab. This is useful for telling several systems apart, for example a main and a backup unit.
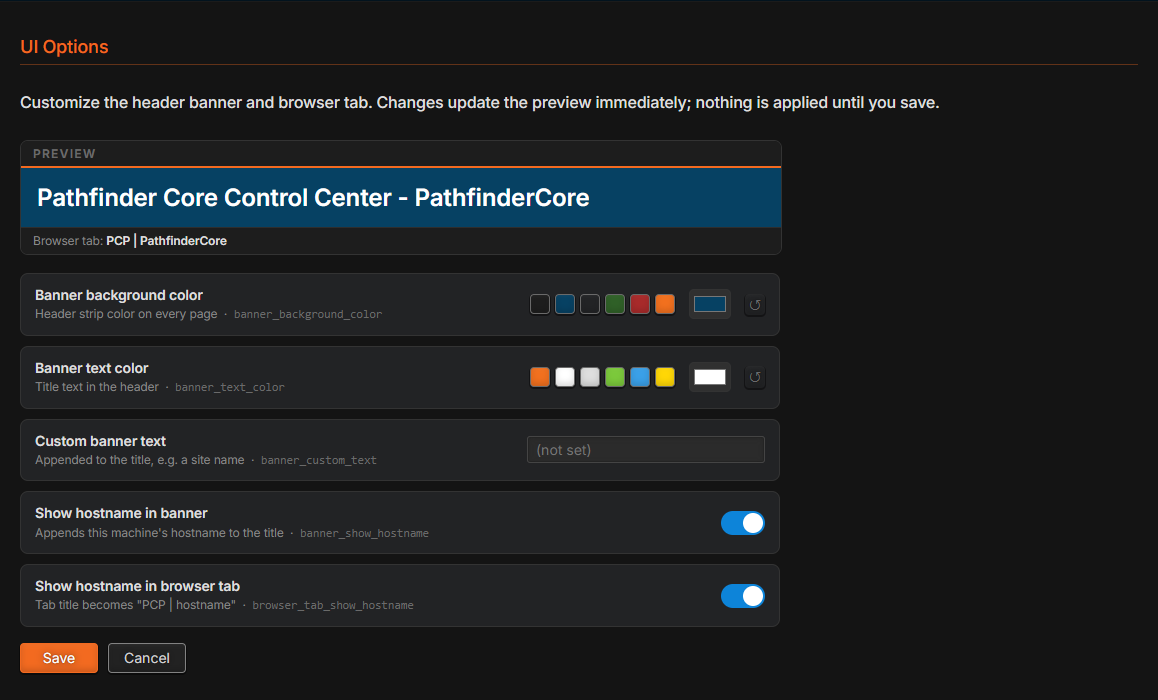
Option | Description |
|---|---|
Banner background color | The color of the banner strip. Pick a swatch or choose any color. The arrow button returns it to the default. |
Banner text color | The color of the title text in the banner. |
Custom banner text | Text added to the title, for example a site name. |
Show hostname in banner | Adds this system's hostname to the title. |
Show hostname in browser tab | Adds this system's hostname to the browser tab, after "PCP". |
The Preview at the top shows the result as you make changes. Nothing changes until you click Save. Click Cancel to leave without saving.
SupportLink
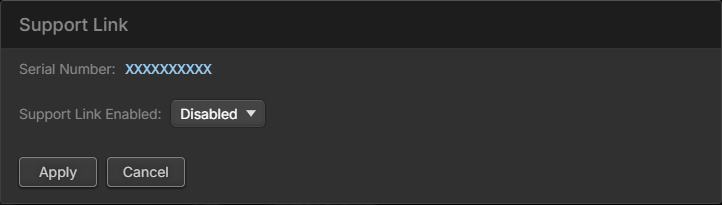
The SupportLink dialog shows the system's Serial Number and lets you turn Support Link Enabled on or off. Enable it only when Telos support asks you to. When SupportLink is enabled, the Support Link button is colored so you can see at a glance that it is on.
Network Configuration Options
Current IP address information is visible in the Network Configuration section of the System > Configuration page.
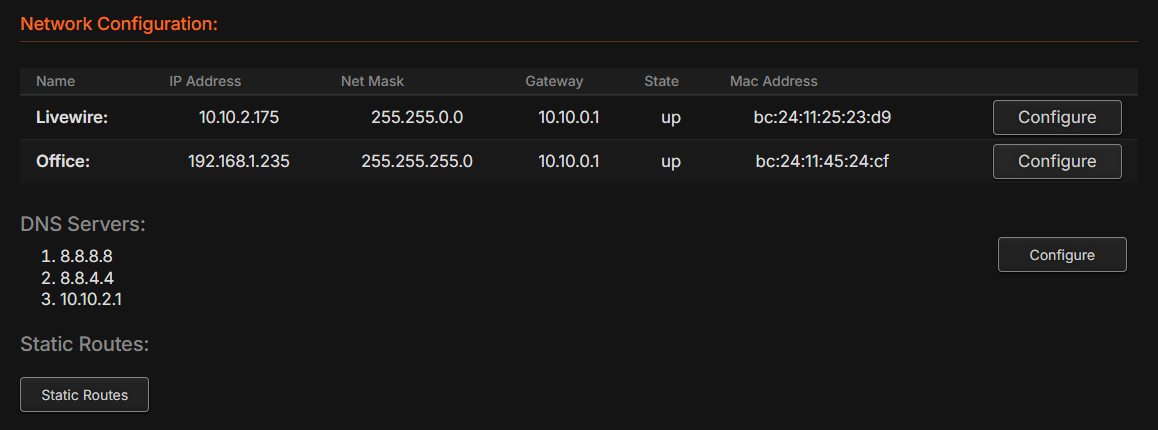
Livewire and Office Configuration
You can edit the system IP options from the front panel display or the web GUI.
Click the Configure button to open the network interface’s Edit screen.
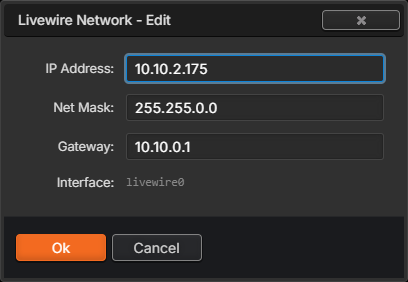
Type the IP Address, Net Mask, and Gateway values and click Ok, or click Cancel to leave this dialog without making any changes.
Important Note: Network interface changes will not take effect until you reboot the system. After you change the IP options, the Network Configuration screen shows the changes in parentheses and adds a Reboot button.
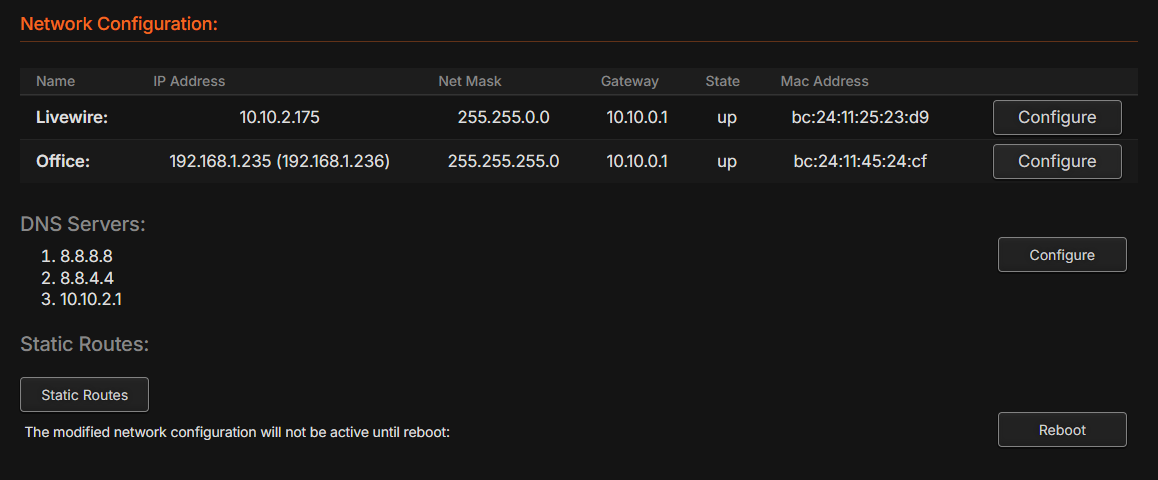
DNS Servers Configuration
The DNS section lists the currently defined DNS servers.
With correctly configured DNS settings, the system can send emails to administrators and employees alerting them to network changes requiring attention. For example, you can send emails when critical sources or destinations such as air chains become silent. To do this, the system must be able to resolve email server names to the correct IP addresses. The DNS entries can also be used when entering NTP server information. Talk to your network administrator if you are unsure which DNS servers to use.
Click the DNS Server Configure button to open the Dns Entries dialog, where you can add, remove, and reorder DNS server entries.
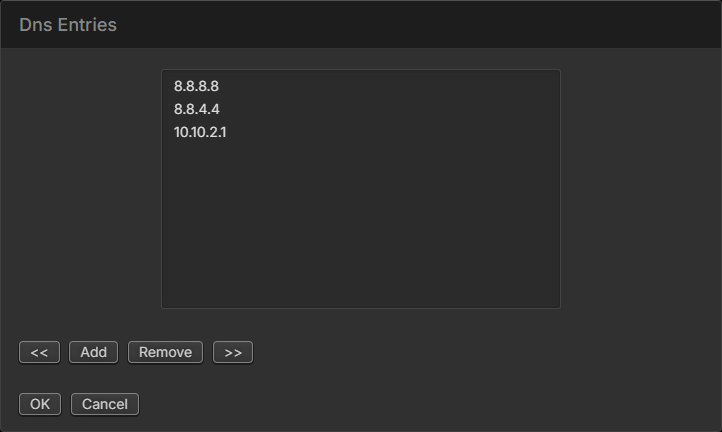
Click Add to add a new DNS server to the list and Remove to remove a DNS server entry.
To move a DNS server up or down in the priority list, select a DNS server entry and click the << or >> buttons.
Click OK to save your changes or Cancel to leave the dialog without making any changes.
Important Note: DNS changes do not require a reboot to become active.
Static Routes
Static routes send traffic for particular networks through a gateway other than the default one, for example to reach a remote studio's network through a router on the Livewire network.
Click Static Routes to open the static route dialog.
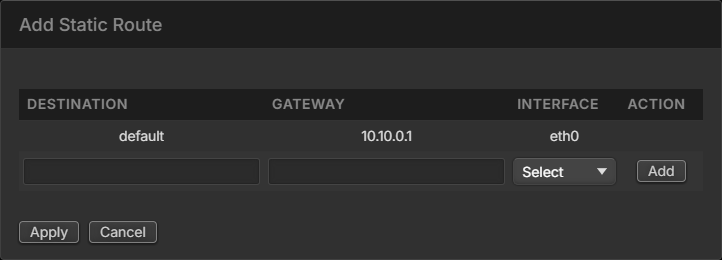
Type the Destination network in slash notation (for example 192.168.50.0/24) and the Gateway to reach it through, pick the Interface, and click Add.
Click Apply to store the routes, or Cancel to leave without making any changes.
Warning: The system does not check the routes you type. An invalid route may not work, or may cut off access to the system. Make sure the gateway address is in the same subnet as the interface you pick for the route.
The default route comes from the interface settings above and cannot be deleted here.
Licenses
Click System > Licenses in the navigation bar to see the system's license points, licensed features and TelosCare subscription, and to add or remove license keys.
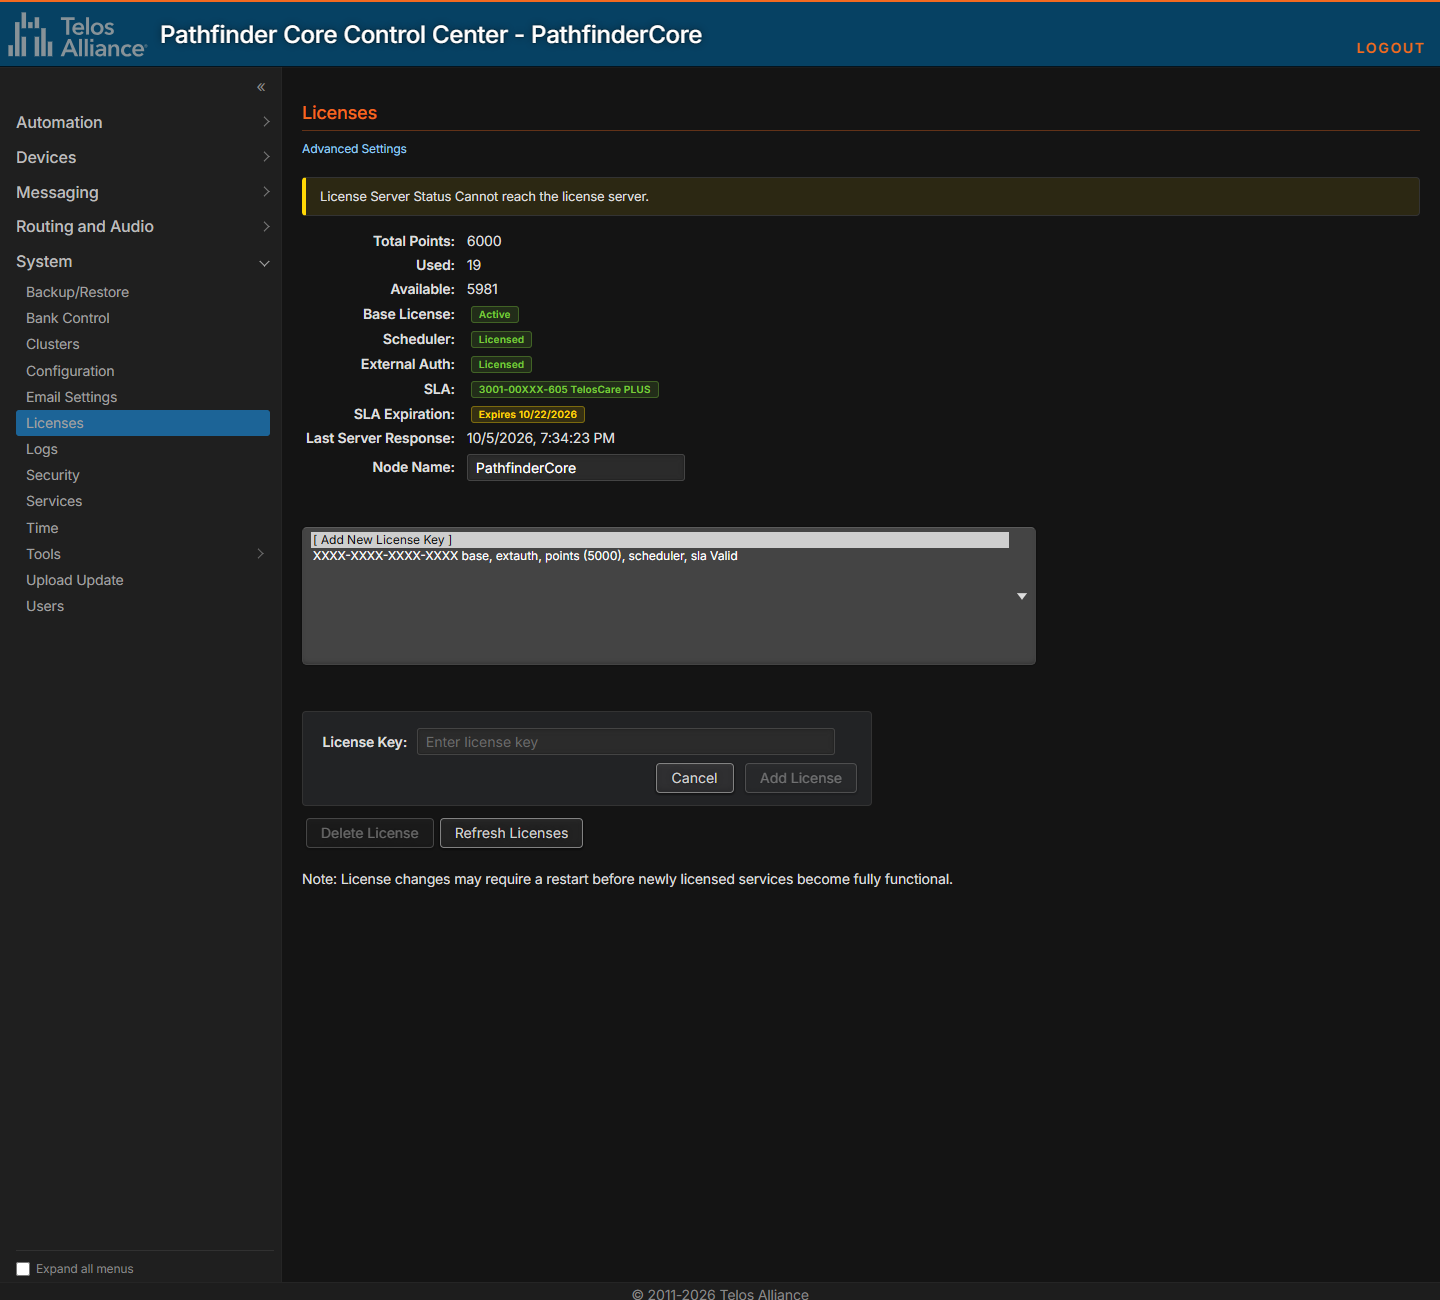
Licensing has its own article. See Licensing for the license types, Key9 license keys, offline activation, custom license servers, license health and the TelosCare subscription.
Backup/Restore
The Backup/Restore page lists all backups in the system. The first time you use this page, there will probably be no backups.
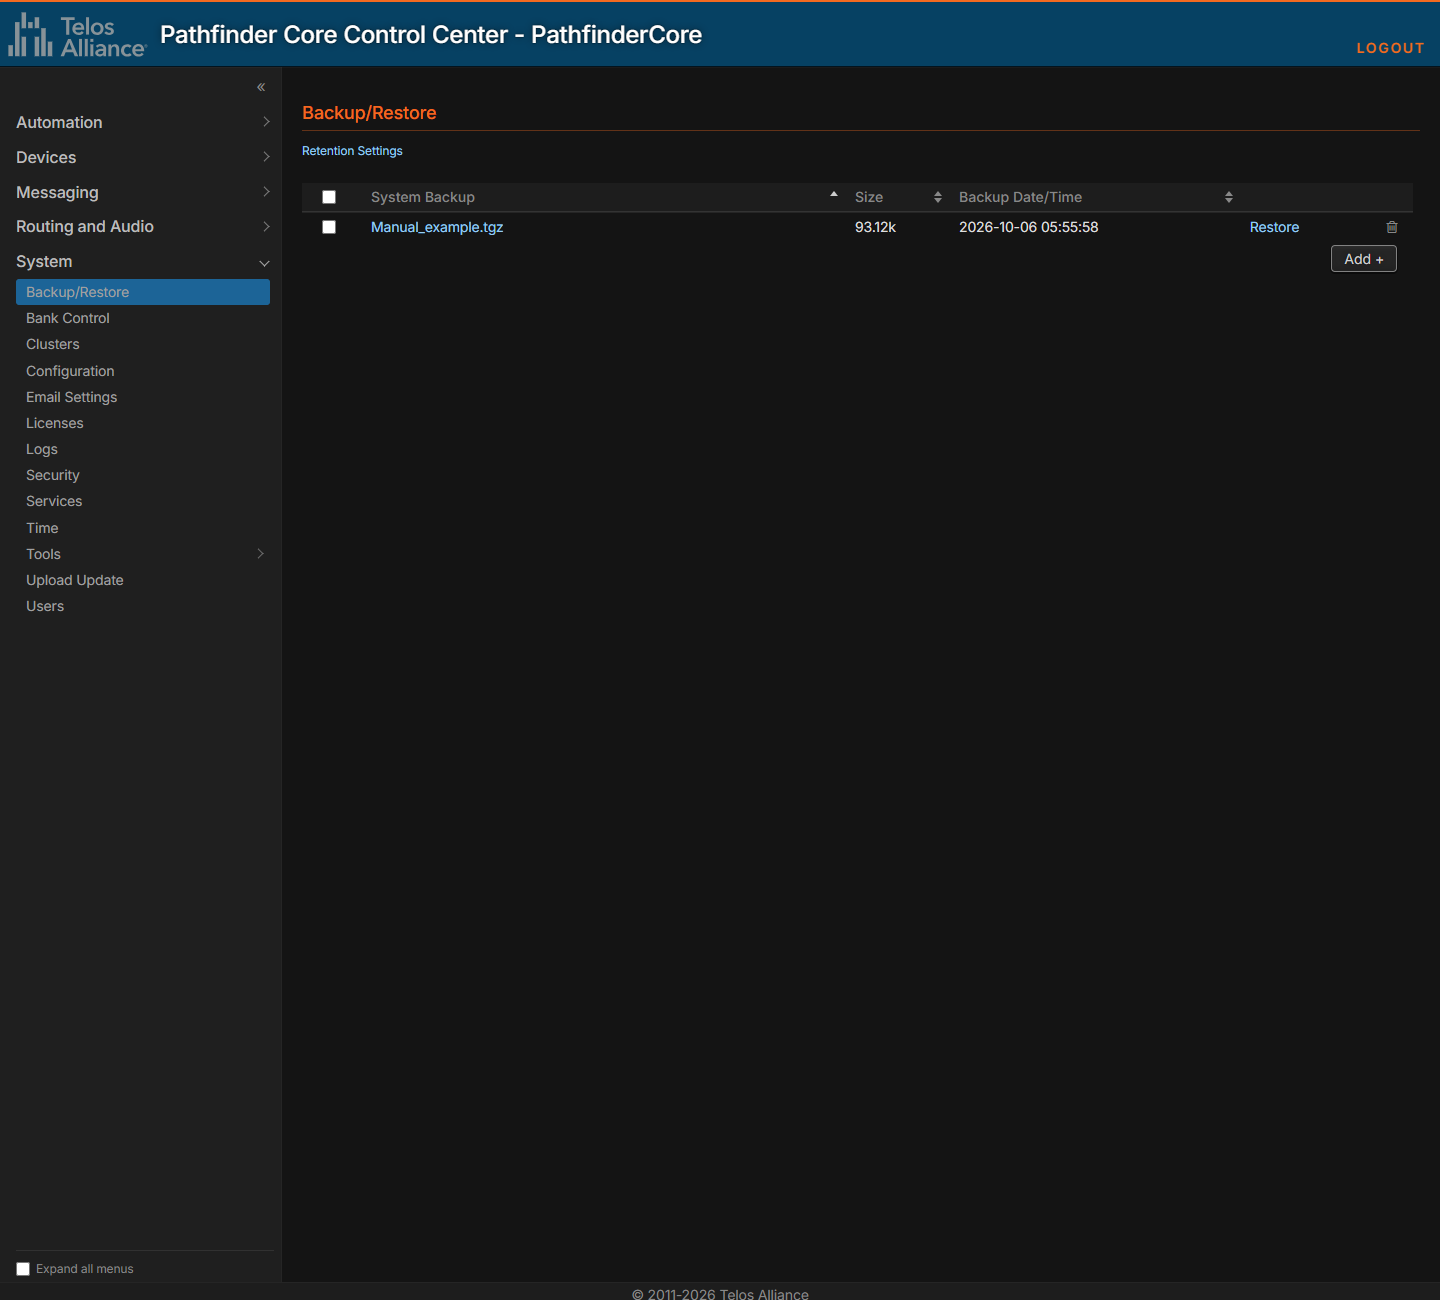
To take a new backup, or to upload a backup from your local computer back into the system, click Add +.
Taking Backups
To create a new backup, click Add +, type a name for the backup on the Create New tab, choose whether to include logs, the IP address, or both in the backup, and then click Create Backup. Click Cancel to exit the dialog without making any changes.
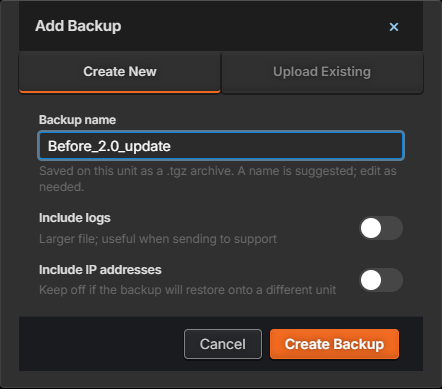
The backup includes any configuration files needed to return your system to its current state, including the trusted root certificates and, when IP addresses are included, the web server's certificate.
If logs are included, the backup will also include all system and application logs currently on the system. The logs can be very useful to Telos support when they are helping to troubleshoot an issue, and they will likely ask you to take a backup that includes log files and send it to them.
If you intend to restore the backup on a different Pathfinder Core PRO, you may want to leave out the IP addresses so that the restore process does not overwrite the IP addresses of the other unit.
Important Note: After taking a new backup, we highly recommend that you click the link to the backup file, download it to your local computer, and store it in a safe location. Backups kept only on the Pathfinder Core PRO system are not true backups, because if the system or storage medium fails, both the system and the backups could be lost. Downloading a backup to your local system also lets you send the backup to support if necessary.
Backups are stored in the software Bank. When you move to a new software Bank, you cannot directly access the backups from the previous Bank. However, if the backup is saved to your local computer, you can upload it into the new Bank.
Uploading Backups
To restore your configuration to a new system, a factory default system, or a system from which the backup has been removed, click Add + and open the Upload Existing tab.
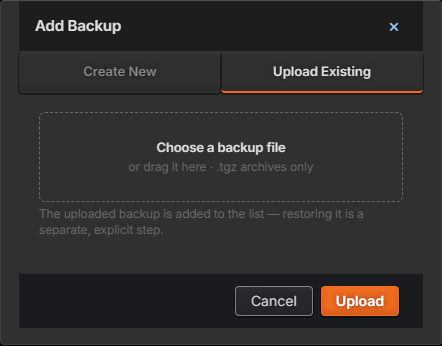
Select a System Backup file on your local system (drop it onto the dialog, or click the dialog to choose it), then click Upload. After the upload is complete, the backup will be available in the Backup/Restore list.
Removing Backups
Click the trash icon to delete a backup from the system. To delete several, check them (or the box in the header, to check them all) and delete the selection.
Because space on the storage medium is limited, keep only a few backups on the system at a time. Retention Settings, below, can remove old backups automatically.
Restoring Backups
Click the Restore link next to a stored backup. The system asks you to confirm that you want to restore it to that state.
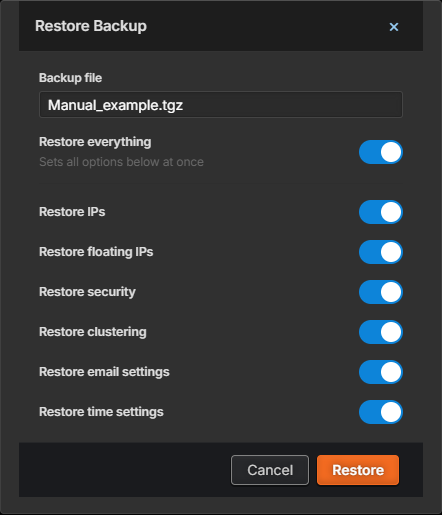
By default, everything in the backup is restored. To restore only part of it, turn off Restore everything and choose which of these to restore: IPs, floating IPs, security, clustering, email settings and time settings. Click Restore to start.
Important Note: The restore is usually quick, but the system is not operational during the restore and reboot.
Retention Settings
Click Retention Settings above the list to control how long backups are kept and to take backups automatically. Changes take effect at the next hourly retention cycle.
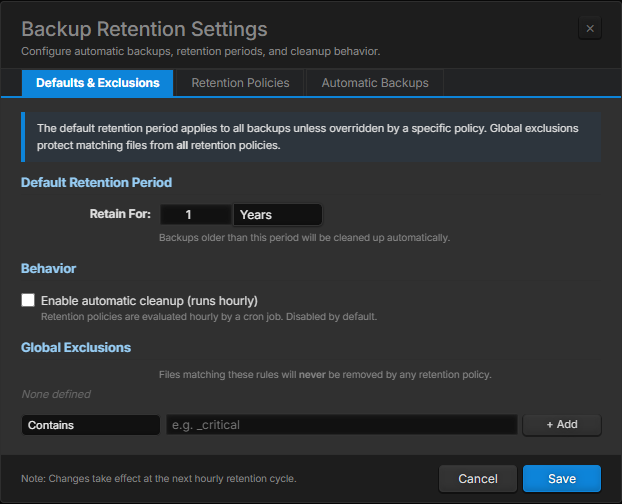
Defaults & Exclusions
Retain For: backups older than this period are removed (by default, 1 year).
Enable automatic cleanup (runs hourly): retention is only enforced while this is checked. It is off by default.
Global Exclusions: backups whose names match these rules are never removed by any retention policy. A rule matches a name that Contains, Starts with or Ends with some text, has a given Extension, or matches a Regex (regular expression).
Retention Policies
Policies are evaluated in order, after the default retention period is applied. Click Add Policy and pick a type:
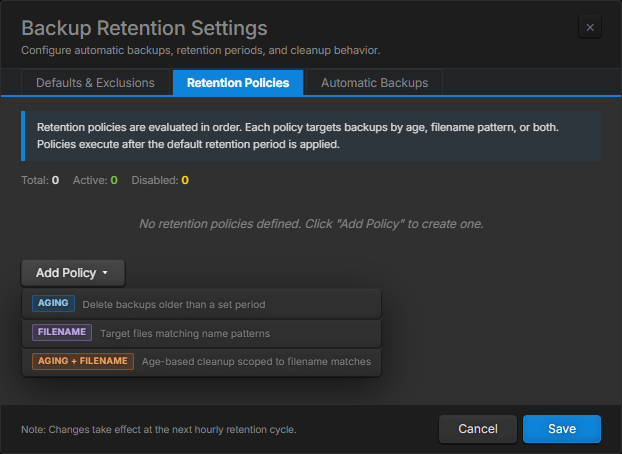
Type | Removes |
|---|---|
Aging | Backups older than a set period (Max Age). |
Filename | Backups whose names match its Filename Rules. |
Aging + Filename | Backups older than the set period, among those whose names match its rules. |
Each policy also has a Policy Name, its own Exclusions, and an Action: Delete permanently, or Flag for review (log only), which only writes a log entry. Uncheck Enabled to keep a policy without using it.
Automatic Backups
Click + Add Schedule to take backups on a schedule. Each schedule runs independently.
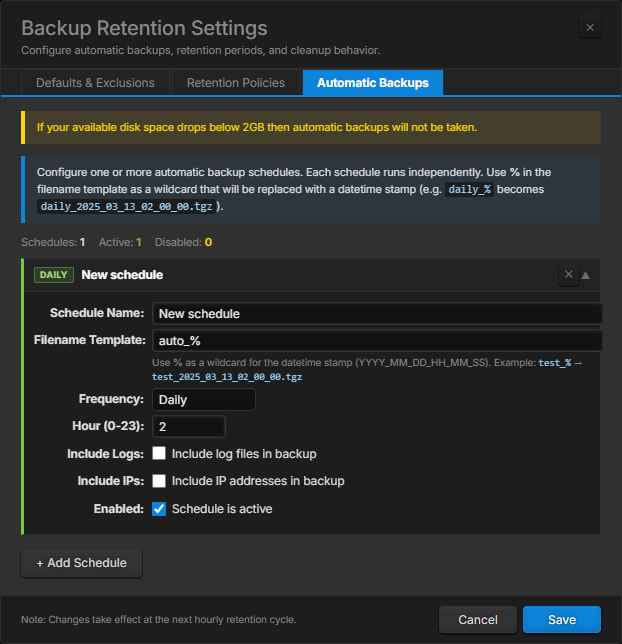
Field | Description |
|---|---|
Schedule Name | A name for the schedule. |
Filename Template | The backup's name. % is replaced with the date and time, so |
Frequency | Hourly (every so many hours), Daily, Weekly (on a day of the week) or Monthly (on a day of the month, 1–28). |
Hour (0-23) | The hour of the day at which the backup is taken. |
Include Logs / Include IPs | The same choices as when taking a backup by hand. |
Enabled | Uncheck to pause the schedule. |
Click Save to store the settings.
Important Note: Automatic backups are not taken while less than 2 GB of disk space is free.
Upload Update
One of the Pathfinder Core PRO Administrator’s most important tasks is updating the firmware periodically. Pathfinder Core PRO is under active development, with many new features planned for future versions. Those features, and fixes for bugs reported by our users, make occasional firmware updates necessary.
The system has two software Banks so if you need to return to an earlier version, it is still in the previous Bank. To upgrade your system:
Take a backup of your system as explained in the Taking Backups section above. We always recommend backing up your system before making any major change. The update process makes its own backup as well, but it is wise to keep another copy on your local computer.
Download the new firmware version from the Axia Audio web site to your local computer. The file name extension is .pfc_upd_enc, which stands for Pathfinder Core PRO update package. It is also a good idea to read the release notes to understand the changes between the version you are running and the version you are upgrading to.
Select the Upload Update link under the System heading in the navigation bar. This page shows the Bank you are not currently running, because the update always loads to the inactive Bank.
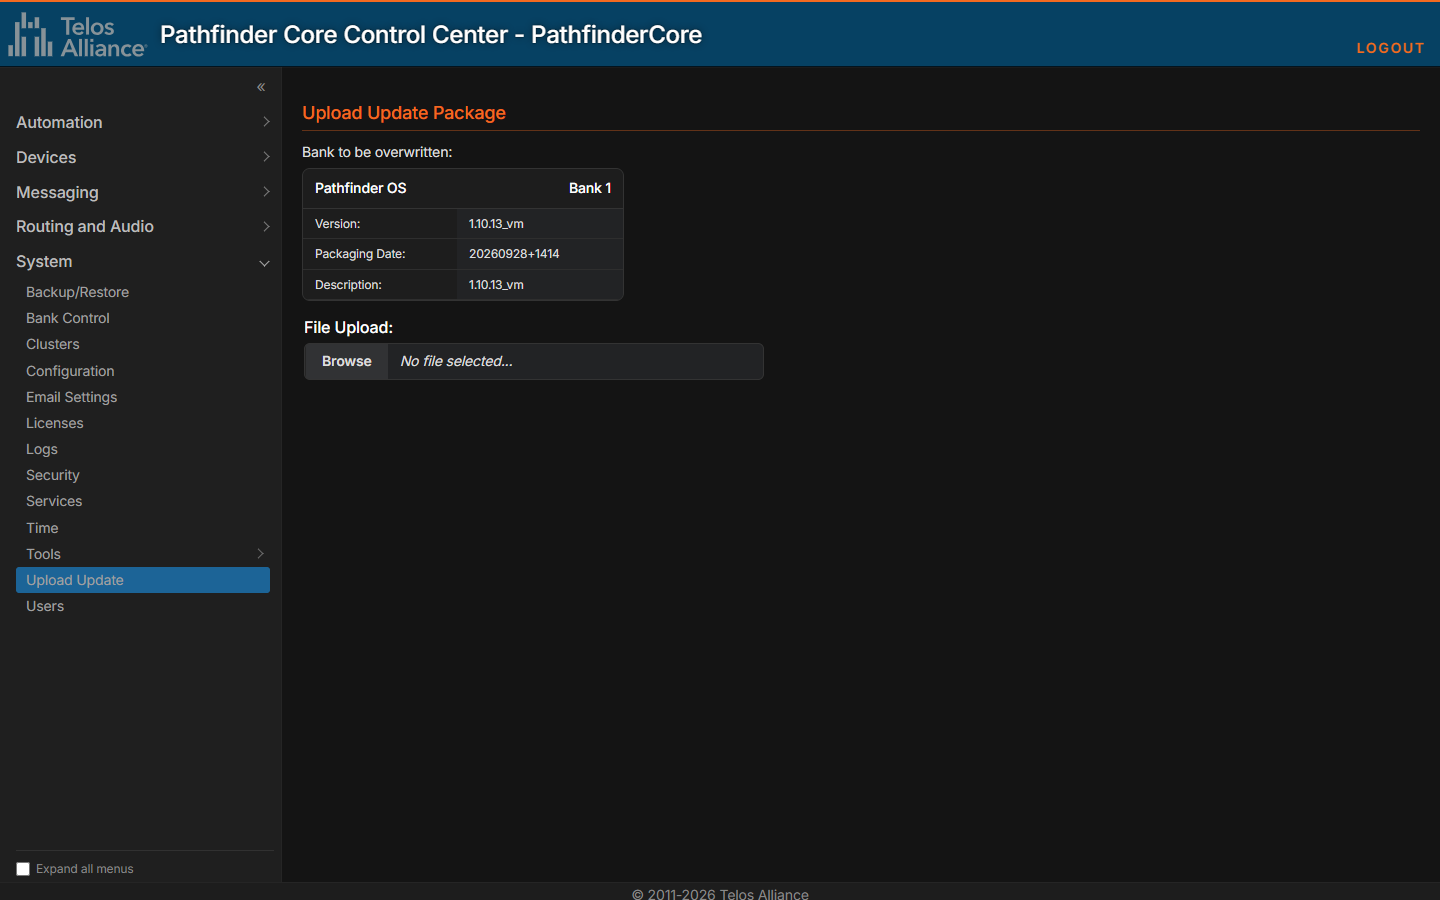
Click Browse and select the file you downloaded from the Axia web site.
The File Upload bar changes to the name of the file you selected, and a status bar appears with the Begin button. If the file is not correct for your type of system (for example, you try to install VM software on an X13 platform), a warning appears.
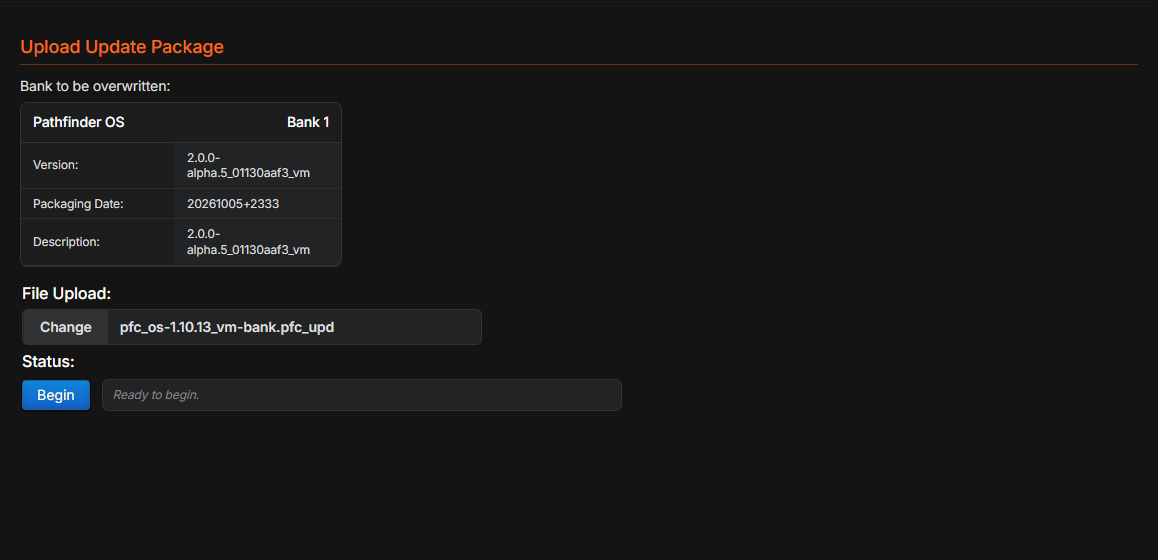
Click Begin to start the update.
A new page appears with a progress bar that shows each stage and what is happening at that point in the update. The update may take several minutes.

Important Note: It is important to understand the status of the configuration files during an upgrade process. The configuration files for the system reside within the currently executing Bank. During the upgrade process, a backup of the configuration from the currently running Bank is automatically made. After the new software is written into the new Bank, the configuration is then restored into the new Bank so that when you boot into the new Bank it has the same configuration that is in the currently executing Bank. However, if you then boot into the new Bank and make changes to the configuration in the new Bank, those changes will not reside in the old Bank. If you wish to return to the old Bank and you have made changes to the configuration, you should back up the configuration on the new Bank, boot into the old Bank, and then restore the backup. This process is outlined in the section on Backup and Restore.
Once the update is complete, you should receive a Processing Succeeded message. Because you are updating the Bank that is not currently active, the system should continue to run even if the update fails.

If you receive an error message instead of Processing Succeeded, contact Telos support.
To boot into the updated Bank and start using the new software, click the Bank Control link in the navigation bar.
Licensing Requirements for Updates
Before an update package is installed, the system checks that it is licensed to run it. Packages of version 2.0.0 and later need a Key9 license, and beginning with version 2.1 a current TelosCare subscription.
See Licensing Requirements for Updates in the Licensing article for the details, including how to move a unit from version 1.x to 2.0.
Bank Control
Bank Control displays the software versions in both Banks of the system and lets you choose which Bank the system runs. Click the Bank Control link under the System heading in the navigation bar to view this page.
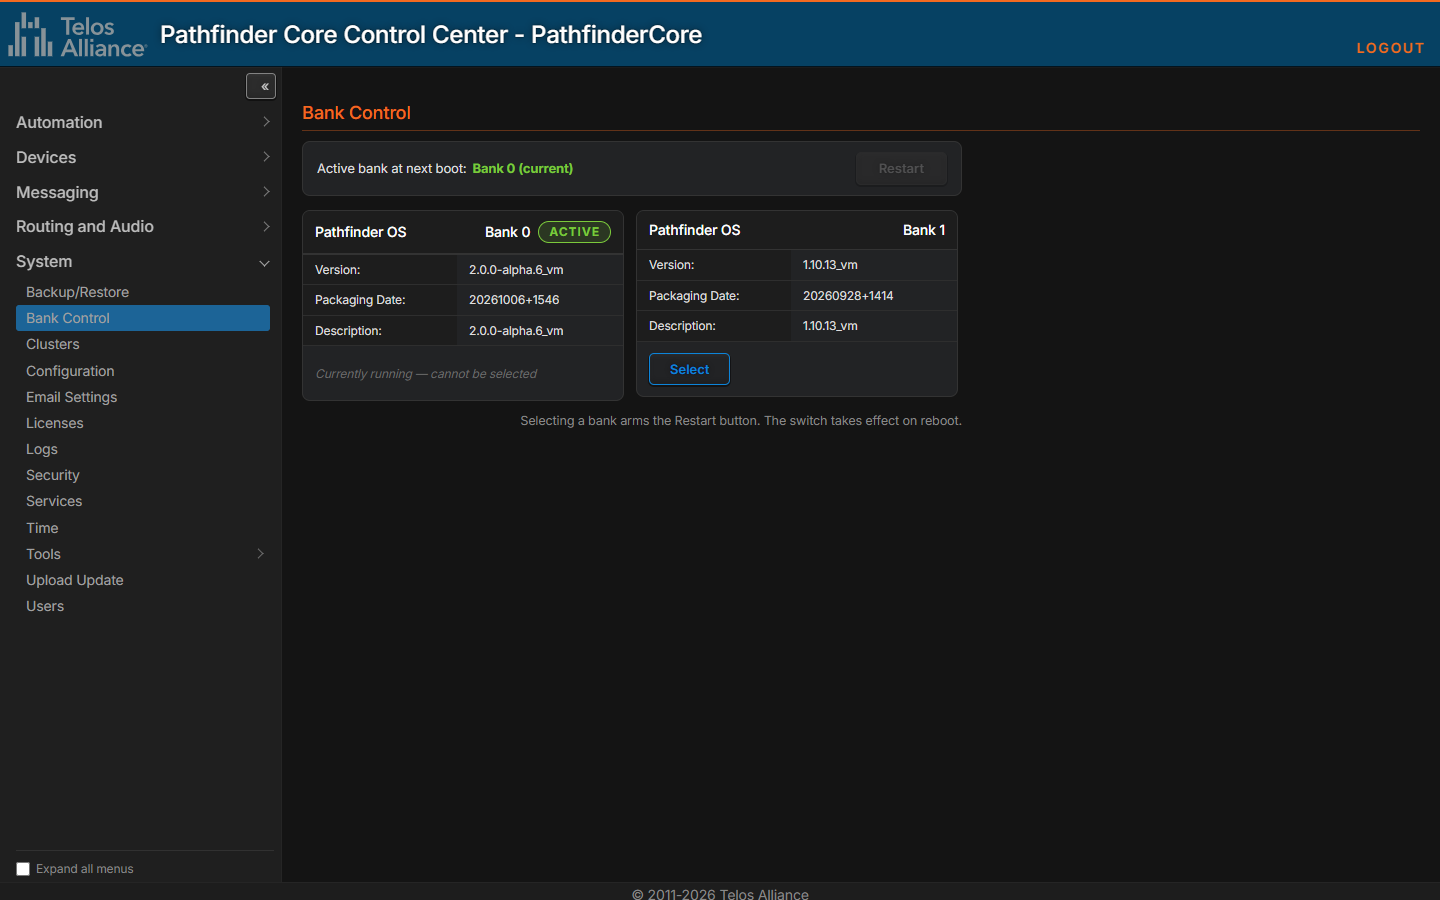
Use the Select button to choose which Bank is used on the next reboot. The line at the top shows which Bank will be active after the next reboot.
After changing the Bank that will be used on the next reboot, the Restart button at the top of the page is armed.
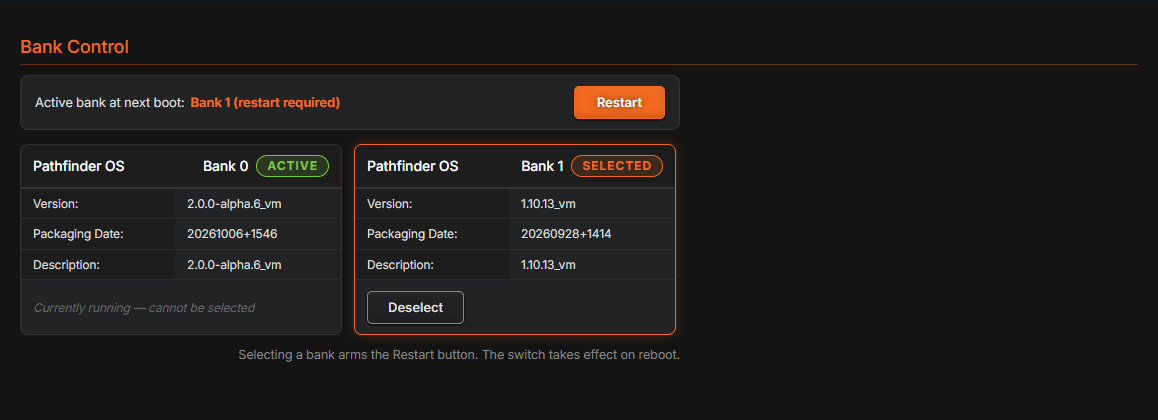
Click Restart to reboot into the newly selected Bank. Click Deselect to cancel the selection.
The information tables display the software version in each Bank. The Bank that is currently executing is marked ACTIVE.
Important Note: When you select a new Bank, the system sets a temporary mark to boot into that Bank. After the system boots into the new Bank, that temporary mark is turned into a normal reboot setting so the newly selected Bank will be used on subsequent reboots. This is called "cementing the Bank." If something goes wrong with the upgrade and the Bank is unusable, the Bank is not cemented, and rebooting the system, either automatically or by disconnecting power, boots it into the previously working Bank. The new Bank is cemented for future boots only if it boots successfully.
This also means that after rebooting into a new Bank you should return to the Bank Control page to make sure the boot was successful and you are executing on the desired Bank. If the boot fails, the system could fall back to the previous Bank, and you will know that only by checking this page.
Important Note: Some browsers occasionally cache the state of this page, even though the page's code asks them not to. If you reboot and the ACTIVE mark does not change, try refreshing the web page. Some browsers have a key you can hold down while refreshing to force the page to reload instead of using the cache; for example, with Google Chrome, hold Shift+CTRL while clicking the refresh icon.
Configuration File Between Bank Changes
Because configuration files reside within the executing Bank, the configuration may be different when you switch to a different Bank. Always take a backup of your configuration before switching Banks, and then restore that configuration on the new Bank.
If you are switching Banks immediately after upgrading the firmware, this backup and restore have already been completed as part of the upgrade process. Otherwise, review the backup and restore procedures earlier in this manual. This also means that if you make a mistake in the configuration in a new Bank, you can boot back into the old Bank to get to an older, working configuration, though backups and restores are a more efficient way to do this.
Services
Click the Services link on the navigation bar to view the Services page.
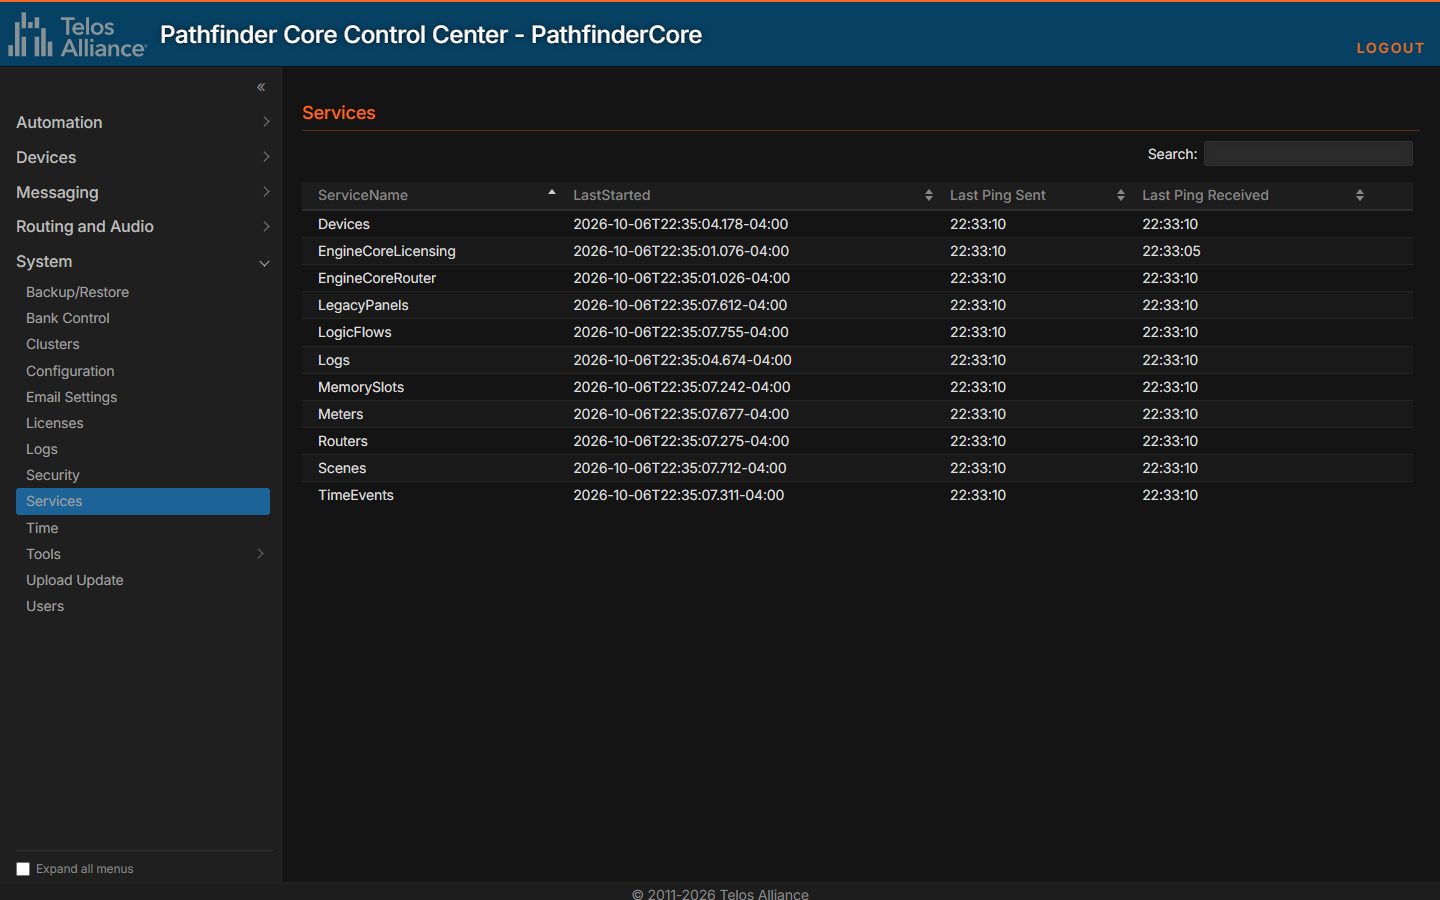
You will use this page only when working with Telos support, but it is worth knowing what it shows. To make Pathfinder Core PRO as robust as possible, the system has a watchdog process. This process monitors the state of each service in the system and sends ping messages to each one to make sure it is still responsive at the application layer. If a service fails to respond within a certain time, the watchdog will restart the service. In the rare case where the watchdog cannot get a service to respond, it might also restart all services, or even reboot the system, after enough repeated failures.
This screen shows each service, when it was last started, and the most recent ping and response time. If you watch this screen, you should see the pings change about every 5 seconds.
In many ways, this page is equivalent to the Services control panel on a Windows machine.
Time
Click the Time link under the System heading of the navigation bar to view the Time settings. The System Time configuration page allows you to define NTP servers, set the system’s time zone, and sync the current time to that of your local PC.
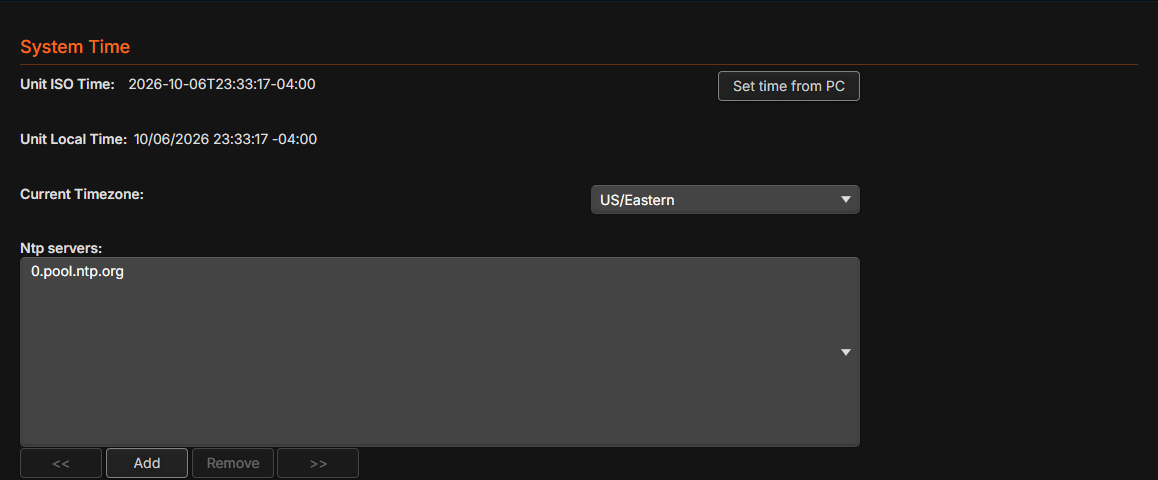
Use the Current Timezone drop-down to select the correct time zone for the system.
Click Set time from PC to update Pathfinder Core PRO’s current time to that of your local PC.
We recommend defining NTP servers in the Ntp servers list so that Pathfinder Core PRO can update its time automatically and always be as accurate as possible.
There are several reasons to keep Pathfinder Core PRO’s time accurate. The first is that the system can define events that happen at specific dates and times. Those events fire at the wrong times if the system’s time is not up to date. Additionally, log files use the system’s time settings to keep track of when changes happen.
Finally, proper cluster synchronization relies on date and time settings to determine whether a specific piece of information is more up to date on one system or the other, and therefore whether that information needs to be synchronized. Talk to your network administrator if you have questions about which NTP servers to use.
NetTools
NetTools runs network tests from the Pathfinder Core PRO itself, so you can check what the system can reach on its networks. Click Tools under the System heading of the navigation bar, and then NetTools. Only administrators can use this page.
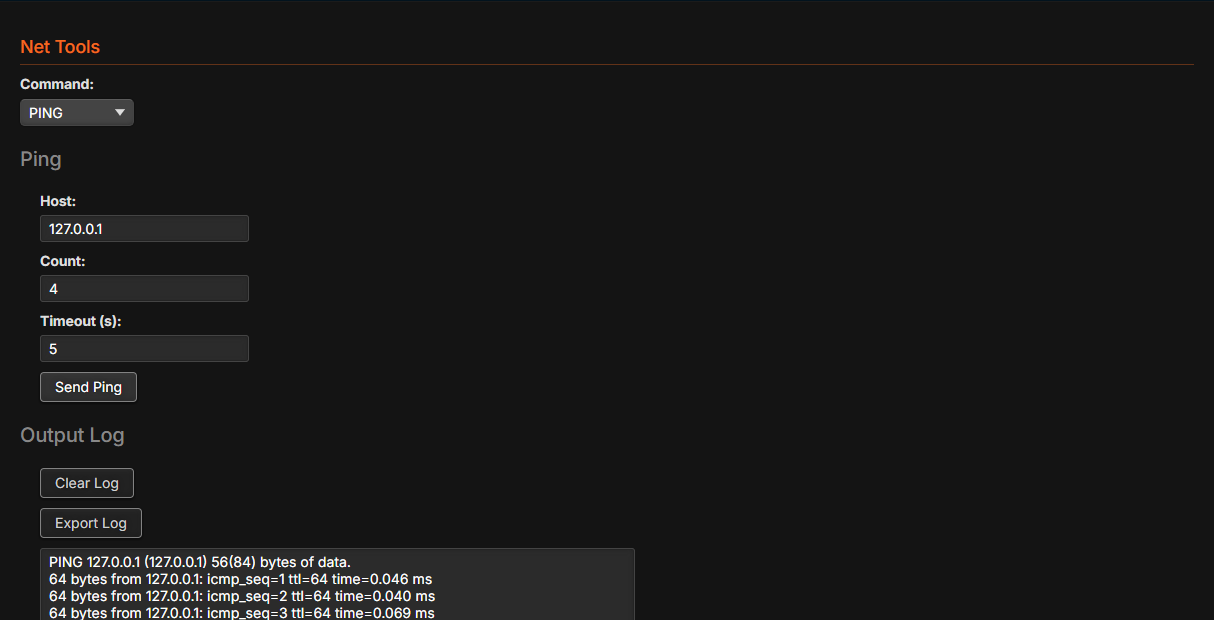
Pick a test from the Command drop-down, fill in its fields, and click its button. The results appear in the Output Log.
Command | What it does |
|---|---|
PING | Pings the Host. Count is the number of pings to send and Timeout (s) is how long to wait for each reply. Click Send Ping. |
NETSTAT | Lists the system's network connections and listening ports. Type any netstat options in Arguments, for example -an, and click Run Netstat. |
NSLOOKUP | Looks up the Host name with the system's DNS servers. Click Run NsLookup. |
TRACERT | Shows each router on the path to the Host. Click Run Traceroute. |
TELNET | Opens a text connection to the Host on the Port you type. The port starts at 9600, the SapV2 port. Click Connect Telnet. |
After a telnet connection opens, type a command in the box below the log and click Send. With Single Line selected, pressing Enter also sends the command, and the up and down arrow keys bring back commands you sent earlier. Select Multi Line to type several commands, one on each line, and send them together with Send.
Clear Log empties the Output Log. Export Log downloads it as a text file. The log is also cleared when you pick a different command.
Email Settings
Before Logic Flows can send emails, you must define the server parameters so that Pathfinder Core PRO knows which email server to use. Under the System section of the navigation bar, click the Email Settings link.
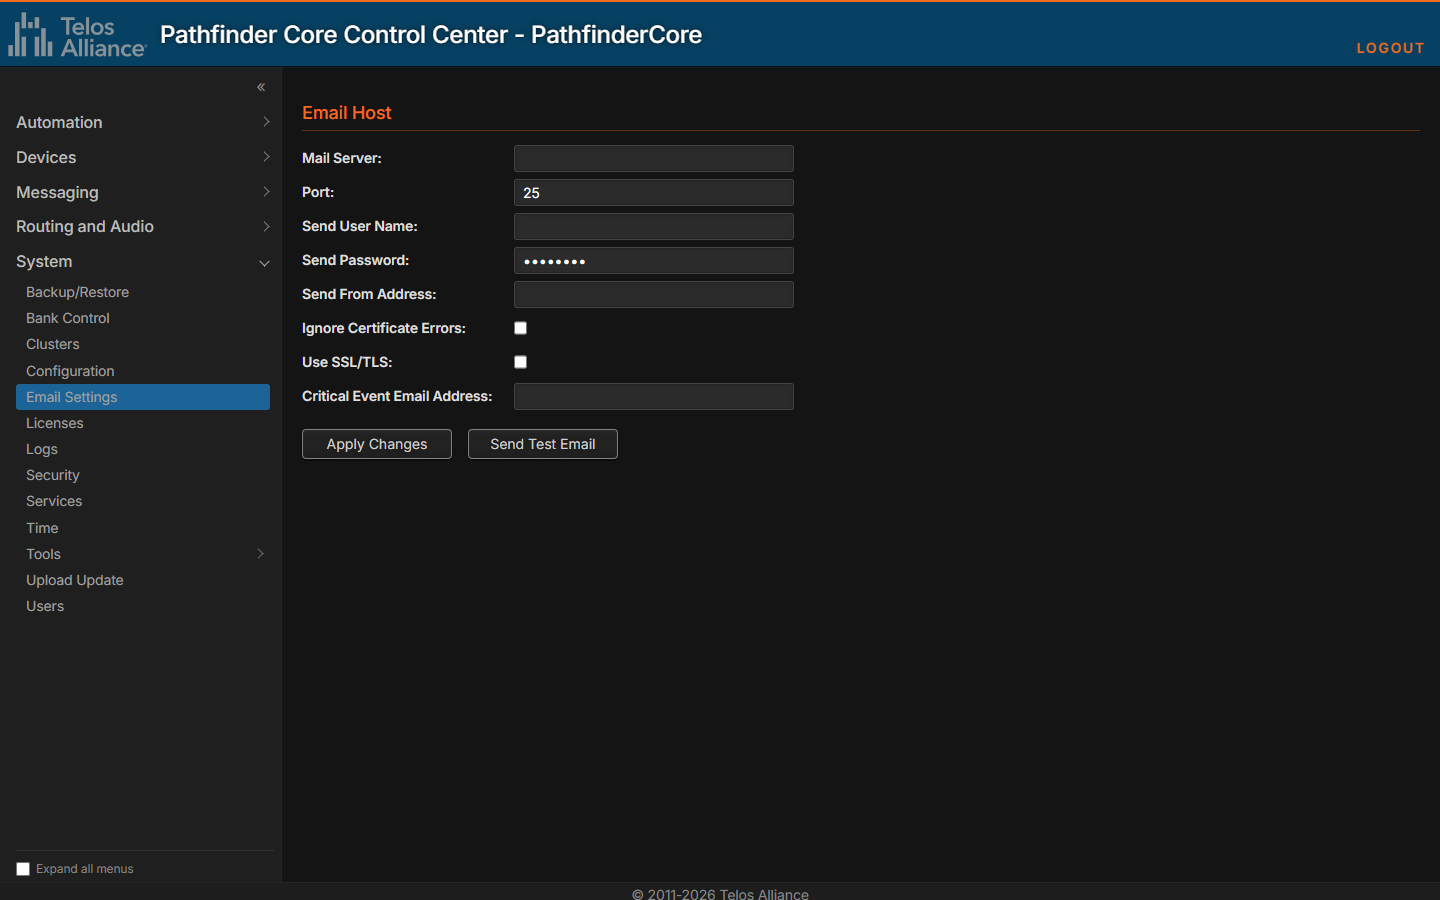
These settings are like those used by any other email client application.
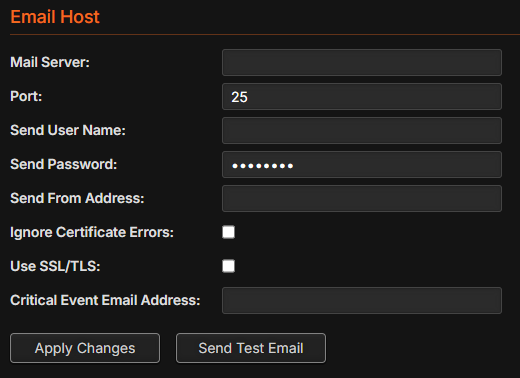
Field | Notes |
|---|---|
Mail Server | Type the name of your mail server. |
Port | Type the port number required by your mail server. Ports 25 and 587 are commonly used by SMTP mail servers. Check with your administrator or your hosting service provider to determine the correct Port setting. |
Send User Name | Type the user name associated with your account on your mail server. See note below. |
Send Password | Type the password associated with your account on your mail server. See Important Note below. |
Send From Address | Type the email address that will be included in the outgoing message’s Send From field. |
Ignore Certificate Errors | If you are using SSL encryption and the SSL/TLS certificate chain provided by the host is not in Pathfinder Core PRO’s trusted list, the message will not be sent and an error will be generated. Checking this option allows the system to use SSL encryption but ignore the SSL certificate error. |
Use SSL/TLS | Check this option to use SSL encryption. |
Critical Event Email Address | Type the email address of the administrator who should receive all emails generated by critical events such as a system restart or a service failure. |
Important Note: While most servers require authentication, some provide security based on the source IP address rather than user credentials. Using a blank username and password makes Pathfinder Core PRO send emails without any credentials. After applying a blank password, the field will most likely show a series of stars, but this does not indicate the presence of a password. In addition to masking the characters of a password, this field also masks the length of the password for security reasons. Therefore, even a blank password will display a constant number of stars in the field after the password has been applied.
Once you have the parameters configured correctly, click Apply Changes to store them to the system. You must click this button before Send Test Email uses the new settings.
Use the Send Test Email button to generate a test email. The page will ask for a destination email address and will then attempt to send the message.
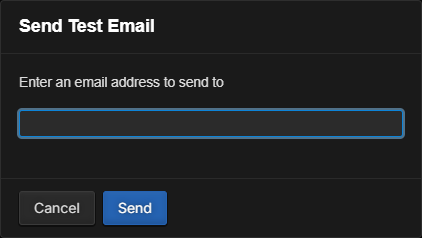
Any errors will be reported. Once you can successfully send test emails, you are ready to create messages that may be used by Pathfinder Core PRO’s event system, Logic Flows.
See the Email Messages section of this manual for details about creating email messages and determining when those messages are sent.
Security
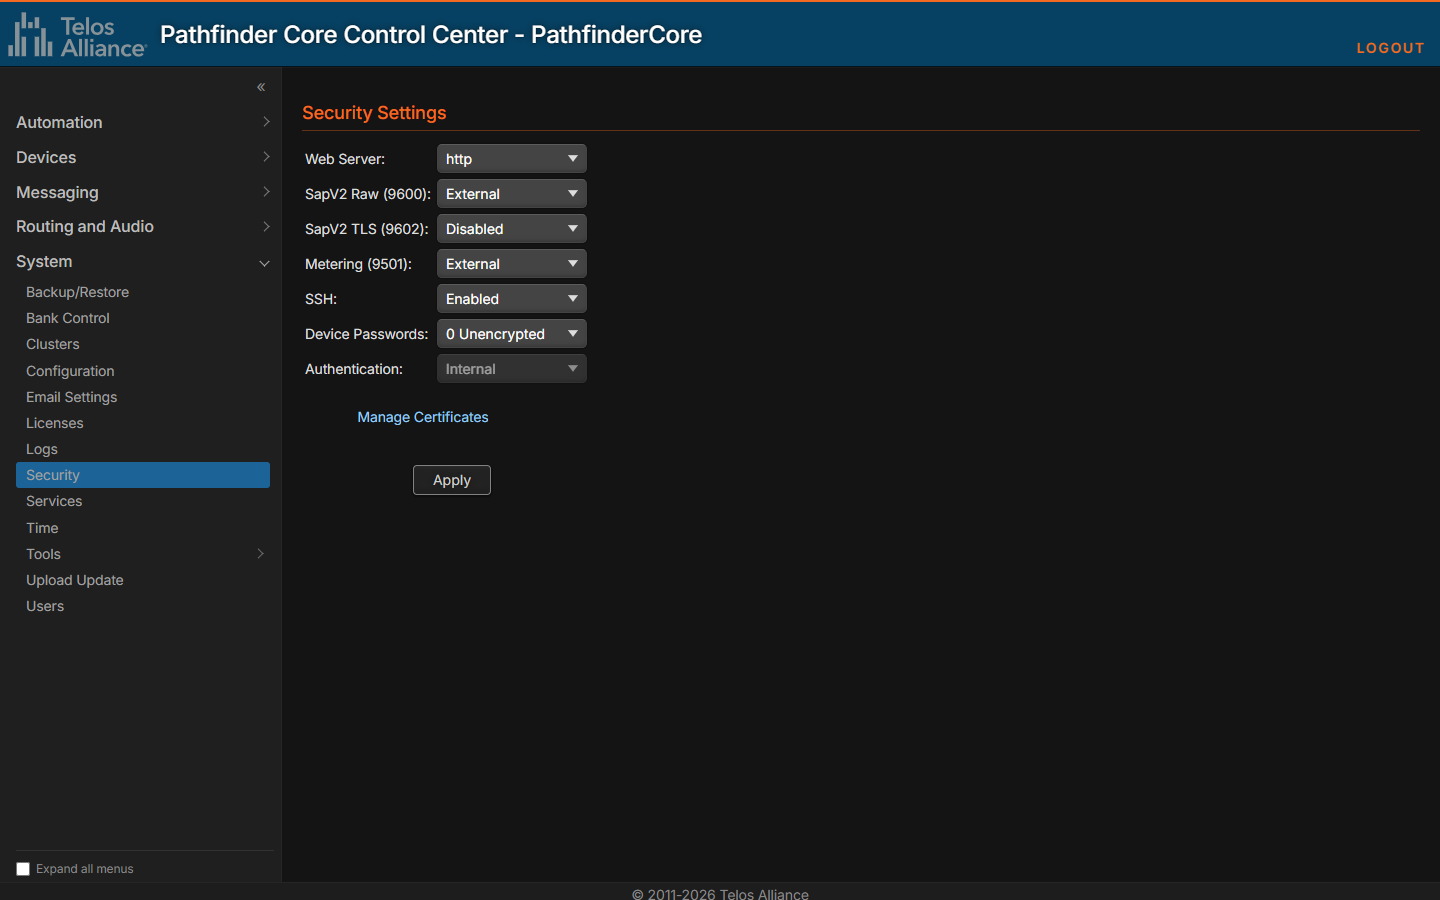
The Security section allows a system administrator to manage SSL/TLS certificates, choose which services are enabled and exposed to the outside world and whether their communications are encrypted, and set up alternate authentication methods.
On Certificates
The security section of Pathfinder Core PRO lets you encrypt browser and other communication traffic. However, this encryption is based on certificates, and a good understanding of certificate-based encryption and the corresponding trust relationships is critical to making it work correctly. The sections below discuss several types of security certificates, which you may or may not need depending on the encryption options you enable. The types are:
Self Signed Certificates: These are the default certificates created when enabling https. These present a public certificate to browsers attempting to connect to Pathfinder Core PRO, and are used in the subsequent encryption of the traffic. However, because self-signed certificates are not signed by a trusted authority, browsers do not trust the certificate by default and present a warning that you must click through to access the system's web pages. It is also possible to add a Pathfinder Core PRO installation's self-signed certificate to a browser's trust list, and that browser will from then on trust that Pathfinder Core PRO installation.
Publicly signed certificates: Pathfinder allows you to generate a certificate signing request, which you can take to a publicly trusted certificate authority such as Let's Encrypt to get a trusted certificate. This solves the browser warning issue. However, you can usually only get a publicly signed certificate if you are using public IP addresses. Therefore, if your Pathfinder Core PRO is not accessible via a public DNS/IP address, this option is not available.
Internally signed CA certificates: An alternative to the publicly signed certificate is to set up your own internal certificate authority. If you are in an Active Directory domain, you can add the certificate authority role to your Active Directory server. Then you can sign your certificates using the Microsoft CA, and any computer in the network that trusts the Microsoft CA will also trust certificates signed by that CA. This allows you to use internal private IP addresses and DNS and still present certificates that the browsers in your network will trust.
Root Certificates: These are certificates that Pathfinder trusts as authorities or just as trusted certificates. While the certificates above are presented to browsers trying to access Pathfinder Core PRO, root certificates are used when Pathfinder tries to access other systems using encrypted traffic. For example, if Pathfinder Core PRO tries to authenticate with an LDAP server using encrypted traffic, Pathfinder needs to trust the certificate presented by the LDAP server before the communication can take place. Also, if encryption is added for clustering communications, all servers in the cluster must trust each other's public certificates. In the case of publicly signed certificates, Pathfinder Core PRO includes the Mozilla public authorities. In the case of internal CAs, you need to add the public root certificate of that CA to Pathfinder's root CA list to trust certificates that CA signs. Lastly, you can add a self-signed certificate directly to the trusted list.
The sections below cover the encryption methods in more detail, but a good understanding of encryption and certificates is necessary to correctly enable and use some of these features. Certificates also have a built-in time limit, so they must be renewed periodically. How long a certificate is valid depends on the certificate provider and the type of the certificate, but one to three years is usually the maximum. You can create much longer times with a self-signed certificate or by managing the options in a private certificate authority.
Web Server
The web server option allows you to switch between http and https. The https option will encrypt all traffic between the browser and Pathfinder Core PRO. When https is enabled, any attempt to access the device using http is forwarded to https.
https requires an SSL/TLS certificate to function. By default, there is an automatically generated self-signed certificate. Because self-signed certificates are not issued by a trusted authority, the browser shows a warning that the connection is not secure.

Clicking the advanced link and then the proceed link gets you past the warning and into the system while still encrypting the data between the browser and Pathfinder Core PRO. There are several alternatives for eliminating the browser warning. The first is to add the certificate as a trusted certificate to the browser on each system that needs to access that instance of Pathfinder Core PRO. This may be simplified in an Active Directory domain by distributing it using a group policy. Alternatively, you can upload your own certificate into the system by clicking the manage certificates link.
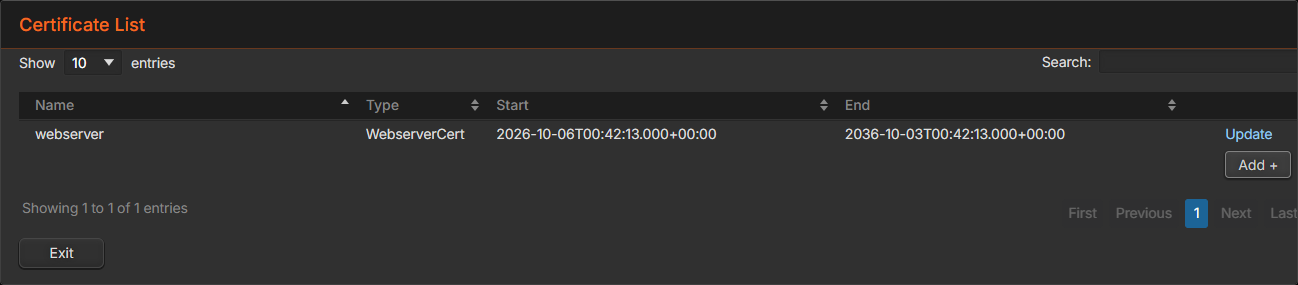
Click the Update link for the web server certificate.
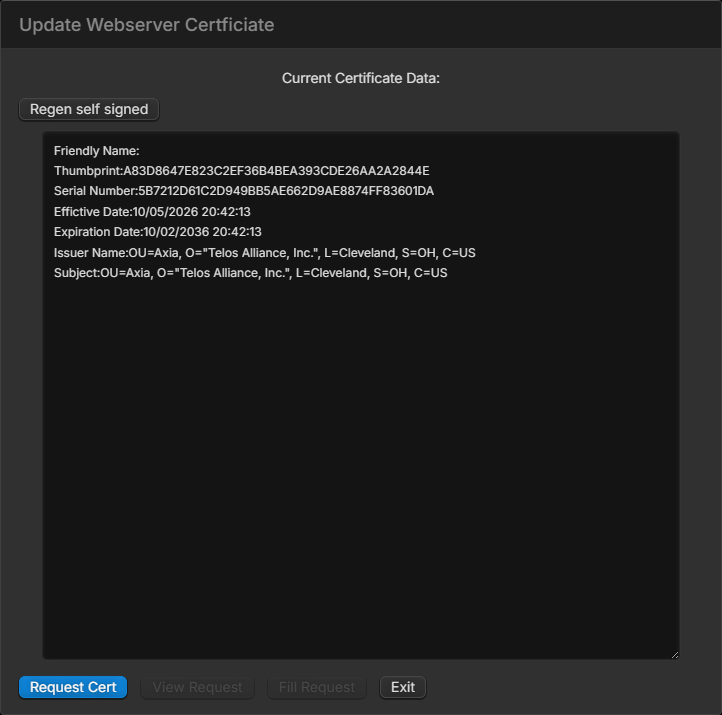
This displays the current parameters of the certificate used for the web server. To generate a new one, click the Request Cert button. This shows the configuration file settings needed to generate a certificate request.
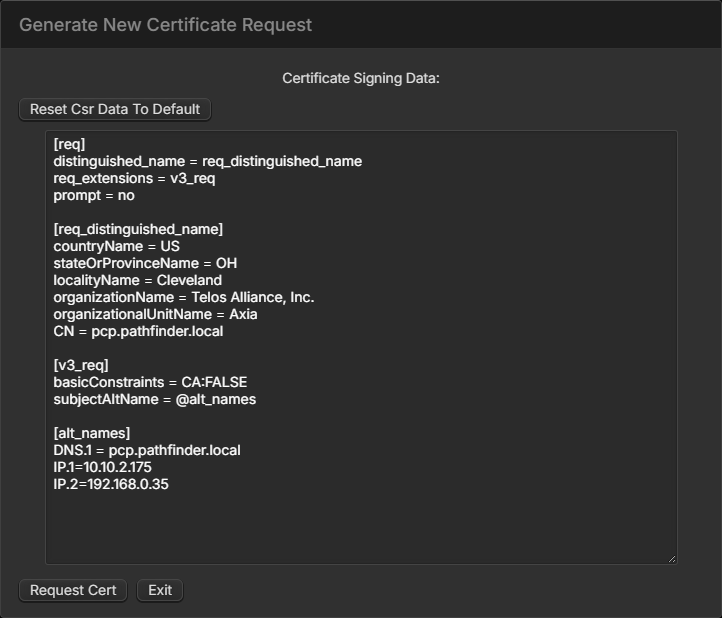
By default, the settings include the local IP addresses in the alt_names section. Add to the configuration any other DNS names or external IP addresses that will be used to access Pathfinder Core PRO. If you have changed this data and want to return it to the factory default, click Reset Csr Data To Default.
Most public certificate providers, such as Let’s Encrypt, only allow publicly verifiable IP addresses and DNS names.
Click the Request Cert button to generate a signing request file based on these settings and Pathfinder Core PRO’s private key.
Note: This will directly modify the signing request data. Validation of correct data structure is currently limited.
After the request is generated, you return to the Current Certificate screen, but now the View Request and Fill Request buttons will be available. Click View Request to see the certificate request data that has been generated.
Copy this data into your certificate authority’s tools for generating a signed certificate.
Important notes for Microsoft CAs: If you are using an internal Microsoft certificate authority, each signing request requires an additional field that is not standard in most other signing requests. Specifically, it requires you to define a template. To do this, copy the certificate request into Notepad, save it as a file such as webserver.req, and then move it to the Microsoft server. Accessing the Pathfinder Core PRO web pages directly from the CA server may require installing a compatible browser on the server or loosening the browser restrictions to allow the web socket traffic. Alternatively, you can save the data using a Windows 10 machine and move the files to and from the certificate server. Then open a command prompt on the Microsoft CA and type:
certreq -attrib "CertificateTemplate:WebServer"This will launch Microsoft’s certificate signer using the WebServer template. The signer will ask you to select the certificate signing request file. It will then ask you to select the certificate authority to use for the signing.
Finally, it signs the file and asks you to store the signed certificate to a new file. For example, you could save it as test.cer.
Whether you sign your request with a Microsoft Certificate Authority or some other CA, the final step is to click the Fill Request button in Pathfinder Core PRO and paste the contents of the new certificate into the Signed Certificate Data field.
Click Apply to validate and store the certificate. The web server then restarts and you return to the security web page.
Certificates signed by an authority other than an official public authority still display as invalid in browsers unless that authority has been trusted on the corresponding machines. For example, if you sign the certificate using a Microsoft CA, it is assumed that you are also pushing the Microsoft root CA as a trusted root certificate to the client computers on your network.
The update web server certificate dialog also includes a Regen self signed button.
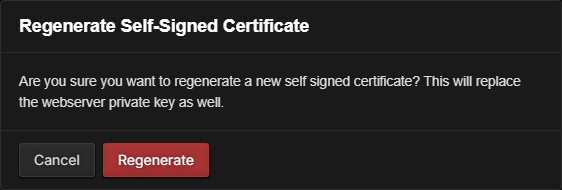
Clicking this button shows a warning, then removes any custom web server https certificate and generates a new self-signed certificate. This also generates a new private key for this certificate.
SapV2 Raw (9600)
This option defines whether the unencrypted SapV2 port 9600 is available externally or only within the box (internal). Some inter-process communications inside the box use this port, so it must be available internally. However, this option will prevent it from being accessed from outside the box.
SapV2 TLS (9602)
This option enables a version of the SapV2 port that is encrypted using TLS encryption. The port will use the same certificate that is used by the https web server encryption. We can provide a tool for working with the encrypted version of SapV2, much as PuTTY works with the unencrypted version. See the section below on security and clustering for details on how this setting affects clustering communications.
Metering (9501)
This option sets whether metering is exposed externally or only internally. If it is exposed internally only, it will still work for any web browser user interfaces built in Pathfinder Core PRO that display metering. This is because those interfaces connect to the web server which then connects internally to this port. This only needs to be exposed externally if you are using a third-party application with the metering service.
SSH
This option turns the SSH port on or off. Typically this port is only used for support to get into the underlying operating system when troubleshooting a problem. Keeping it disabled except when support needs it tightens the security of the system by removing the open port.
Device Passwords
The device passwords option stores the passwords used for logging in to devices, the email password, and the clustering password in symmetrically encrypted or unencrypted form in the server storage. Once the passwords have been encrypted, you cannot downgrade to an older version of the software that does not support this feature or restore a backup with the encrypted passwords to an older version of the software. If that is required, switch back to the decrypted form before downgrading. Changing this setting starts a process that encrypts or decrypts all instances of these passwords in the system.
Authentication
This option requires an optional External Authentication license. Beta testers may request a 90-day evaluation license for this feature. Once that license is installed on the system, this option will be available. It allows you to switch between using Pathfinder Core PRO’s internal user list to authenticate users, and using an LDAP server to authenticate users. For example, enabling LDAP in an Active Directory server will allow you to use the users in your Active Directory domain as the login credentials to access Pathfinder Core PRO. This gives you a single point of user management, so you do not have to manage users in both your Active Directory domain and your Pathfinder Core PRO system.
Make sure you understand how this feature works before you enable it, or you may lock yourself out of the system. If that happens, see the recovering from an authentication lockout section below.
After LDAP is enabled, each login sends the username and password credentials to the LDAP server for authentication. If authentication is successful, Pathfinder will also request a list of the groups that the user is a member of. One of those groups must match a security group in Pathfinder Core PRO for access to the system.
You can create a security profile in Pathfinder Core PRO by adding a security group on the Users page with the name you will use for the group name in the LDAP server (the match ignores upper and lower case). Then configure that group's permissions in Pathfinder Core PRO. For example, if your LDAP group name is PcpAdmin, then you need to create a Pathfinder Core PRO security group with the name PcpAdmin and configure the correct permissions for it. Then, within Active Directory, you can add users to the PcpAdmin group. When those users log in to Pathfinder Core PRO with their Active Directory user name and password, they have the rights of the PcpAdmin security group because they are members of that group in Active Directory. See Security Groups and LDAP in the Users article.
A user can pass correct credentials to LDAP but still be denied access because they are not a member of any group that is allowed to use Pathfinder Core PRO. For that reason, take the following steps before you enable LDAP authentication.
Make sure that the URL you will use for the LDAP server is resolvable by the DNS servers specified in Pathfinder Core PRO. For Active Directory, this usually means adding the Active Directory servers as DNS servers in the Pathfinder Core PRO DNS section.
Make sure you have created a group in the LDAP server that matches an administrative security group in Pathfinder Core PRO. For example, create a PcpAdmin security group in Pathfinder Core PRO that has Admin privileges and create a PcpAdmin group in an LDAP-enabled Active Directory server.
Check Emergency Access for at least one administrator, so that you can still log in if the LDAP server cannot be reached.
Make sure you have at least one user in the LDAP server assigned to the administrative group.
If you are using Active Directory, make sure that LDAP is enabled on your Active Directory servers.
If you want the LDAP communications to be encrypted, you need a public certificate in the LDAP server or have an internal certificate authority and import the correct root certificate into Pathfinder Core PRO so that Pathfinder Core PRO will trust the internal CA's certificate. See below for more on this.
If you skip these steps, switching to LDAP will likely lock you out of the system.
To configure LDAP, use the Authentication drop-down to display the LDAP configuration settings.
An External Authentication license is required for the following items to be active.
Enter the proper parameters for your LDAP server.
X-Ldap-URL: A comma-delimited list of LDAP servers to try for authentication.
X-Ldap-BaseDN: The point in the domain structure that will be used to search for users.
X-Ldap-BindDN: The LDAP user that will be used to query the domain. We highly recommend that this user have read-only rights to the domain. It is the user that Pathfinder Core PRO will use to access LDAP and authenticate other user credentials.
X-Ldap-BindPass: The password for the BindDN user.
X-Ldap-Starttls: Whether the LDAP communications use TLS encryption. TLS must be enabled on the LDAP server, with a proper certificate trust relationship configured.
Use the test button to test your configuration options before applying them. Make sure you test before applying, as applying incorrect parameters can result in a lockout from the system. Generally, we recommend getting LDAP working correctly without TLS encryption first, and then working through the TLS option. Clicking test asks for a username and password, which are then passed to the LDAP authentication engine along with the entered parameters. A successful test means that the system was able to contact the LDAP server and use the bind paths and user to authenticate the user credentials supplied. It does not test for proper group membership, so a successful test can still result in a lockout if the authenticated user is not a member of a group that has a matching security group in Pathfinder Core PRO.
Once the test is working and you are sure that the users are members of groups with matching security settings in the users section of Pathfinder Core PRO, you can apply the changes. The system then presents a new login screen, which should rely on LDAP user credentials for access to the system.
LDAP Urls
You can use a comma-delimited list in the X-Ldap-URL section to try multiple LDAP servers. The system loops through the LDAP servers in order and attempts to bind to each one. If a bind is successful, it then tries to authenticate a user. If the authentication fails, the system does not try the next server. The looping mechanism is only to achieve a successful bind. The servers are assumed to have synchronized user data, so a failed authentication on an active LDAP server equates to a failed authentication on all active LDAP servers. Each additional LDAP server connection that is tried also adds delay to the authentication process, so put your most highly available server first in the list.
LDAP Base DN
With LDAP authentication, you may sometimes need to query several different base domain name groups for a user. It is better to find a base point that is common to them and issue one search, but when that is not possible you can specify multiple search paths by using the pipe character (|). For example:
cn=Users,dc=saitest,dc=localcn=Users,dc=saitest,dc=local | ou=Security Objects,dc=saitest,dc=localThe first option queries only the Users group. In the second case, the Users group is queried first and, if no match is found, the Security Objects organizational unit is queried.
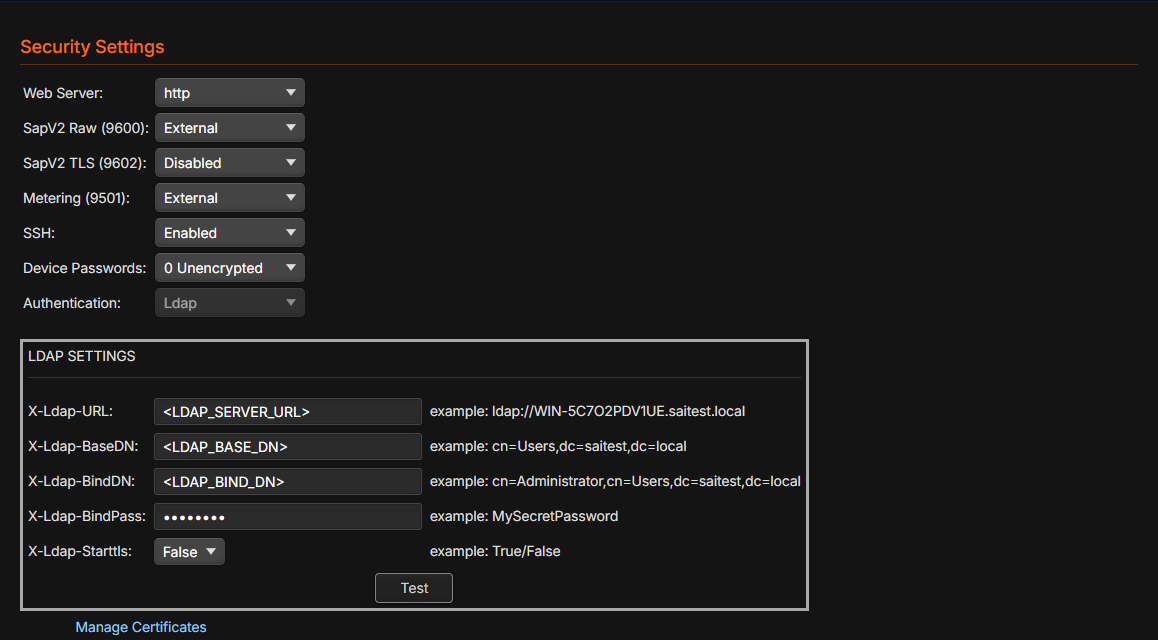
Adding many base paths is not recommended, because multiple queries can slow down the login process. The pipe option only works for the X-Ldap-BaseDN field.
Warning: The pipe syntax in the BaseDN field cannot be used by previous versions of the software. If you add it as part of the authentication process, remove it before downgrading to an earlier version.
We also recommend upgrading both nodes of a cluster before trying this option.
LDAP and Starttls
If the Starttls option is set to true in the LDAP configuration, the LDAP authentication engine attempts to use a TLS encrypted path to access the LDAP server. For this to work, LDAPS (SSL/TLS LDAP) must be enabled in the LDAP server and a corresponding certificate must be in place. More importantly, the Pathfinder Core PRO LDAP engine must trust the public certificate presented by the LDAP server. If your LDAP server has a publicly trusted certificate, this should happen automatically, because Pathfinder Core PRO includes the Mozilla trusted certificate root authorities. However, in many cases the LDAP server may be internal only and not have a trusted certificate. In this case, we recommend generating the certificate with an internal root authority and adding the public certificate for that internal root to Pathfinder Core PRO. For example, the following articles describe how to add a certificate authority role to an Active Directory server and set up a root certificate and LDAPS certificate in Active Directory.
https://pdhewaju.com.np/2017/03/02/configuring-secure-ldap-connection-server-2016/
https://bl.ocks.org/magnetikonline/0ccdabfec58eb1929c997d22e7341e45
Once this is set up, export only the public portion of the root certificate and add it to Pathfinder Core PRO. Click the security link in the navigation bar, click the manage certificates link, and then use the add button (+) to add a new trusted root certificate.
Once the root certificate is added, any certificates the Active Directory server creates based on that root certificate will be trusted by Pathfinder Core PRO. You can add additional root certificates or remove root certificates, but you cannot edit them. If editing is required, remove the old certificate and then add the new one.
Once the trust relationship is configured, you can enable TLS in the LDAP configuration and then use the test button again to verify it is configured correctly before applying the changes.
Troubleshooting the LDAP configuration
While you are getting LDAP working, the sai-ldap-auth log often gives hints about why the LDAP test is failing. Click the logs link in the navigation bar and then the system logs link to find that log. If the log is open in the browser, refresh it to see new messages.
Emergency Access
If LDAP or Active Directory cannot be reached, users with Emergency Access checked on the Users page can still log in. Browse to /emergency/ on the system (for example http://<address>/emergency/) and log in with the user's local Pathfinder Core PRO password. The LDAP server is not consulted. Users without Emergency Access are refused with Emergency Access Denied.
Check Emergency Access for at least one administrator before you switch to LDAP. On a new system, it is not checked for anyone. Systems upgraded from earlier versions have it checked for the Admin and ClusterAdmin users. See the Users section of this manual.
Recovering From an Authentication Lockout
If you configure authentication incorrectly and get locked out of the box, use the Reset Security option in the front panel menu system.

To access it, tap enter to get to the menus, and then system to find the reset security option. This menu option resets https to http, sets the authentication back to internal, and removes the Admin user's password. The next time you connect with a web browser, the first-time setup page appears so that you can choose a new Admin password. Other users keep their passwords.
Browser Anomalies
Occasionally, after you switch from http to https or change the authentication method, some graphics may be missing. This happens once after the change, because cached images have different http/https locations. To fix it, close all instances of the browser, then open the browser and log in again. Because these parameters are usually set up once and then not changed, it should not happen again.
Security Settings and Clustering
Most of the settings within the security section do not automatically sync across the cluster when they are changed. However, make sure they are set the same on all nodes of the cluster. The sync is not automatic because certificates are usually involved, and these differ from host to host and so must be set up first.
It is particularly important that the Device Passwords setting is the same across the cluster. If this setting is different on different nodes, the synchronization of new devices may not obtain the correct ability to log in to devices.
The SapV2 Raw and SapV2 TLS settings also affect clustering. Clustering uses the SapV2 protocol for cluster synchronization, so either the unencrypted or encrypted port for SapV2 must be available for clustering synchronization to work. Additionally, if the node has the encrypted port enabled, then clustering will only attempt to use the encrypted port for clustering communications. We highly recommend that you set up your desired security settings and certificates on both servers before setting up the cluster.
If TLS encryption is enabled, the clustering synchronization must be configured to trust the certificates of other members of the cluster. If you are generating certificates using a trusted authority, no further action should be necessary. If you are generating certificates using an internal CA, you need to add the CA's public root certificate to all servers in the cluster, and then the communications will be trusted. If you are using self-signed certificates and TLS encryption is enabled for SapV2, the first attempt to join Server B to Server A when creating a cluster will likely fail and produce a certificate trust dialog.
The same applies when SapV2 TLS is turned on for an existing cluster. The nodes switch to the encrypted port (9602) when they next restart, and each node that does not yet trust the other's certificate shows Certificate FAILED — review on that node's card on the Clusters page, with the node OFFLINE:
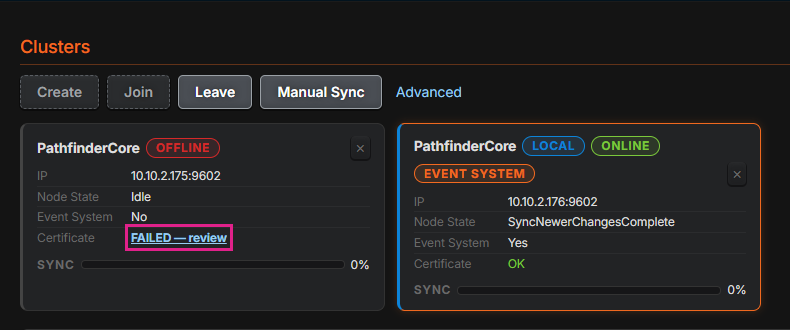
Click the FAILED — review link to open the Trust Certificate dialog, which shows the other node's address and certificate details:
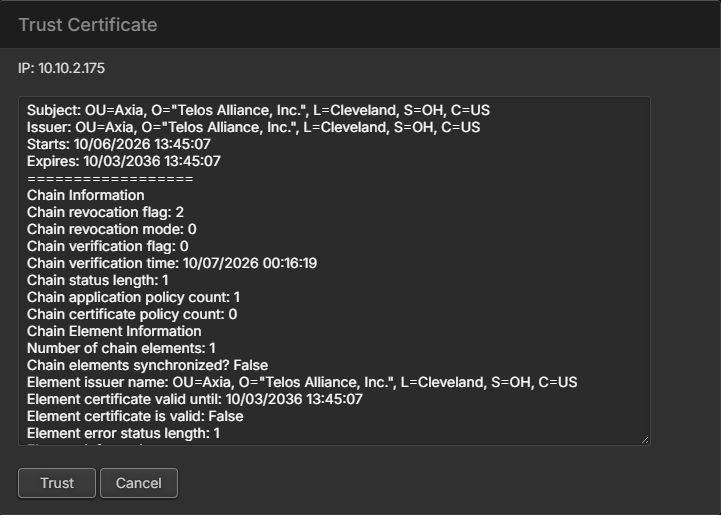
Clicking Trust adds the public certificate from the other node to the trusted certificate store. Then attempting the join again should work, and after the restart and sync, Server B should show the correct clustering state. However, if you then go back and refresh Server A’s Clusters page, it may show the failed link for Server B. Clicking the failed link presents the certificate trust dialog again and lets you trust the certificate from Server B. It should then connect properly. Both servers should now trust each other. This may not be necessary if you are using certificates signed by a publicly trusted authority.
LDAP Token Synchronization
LDAP login tokens are synchronized across the cluster, including their removal for inactivity. This means that a successful login to one node in the cluster counts as a successful login to all nodes in the cluster. However, a redirect from one server to another after a failure is still likely to fail or request a new login. This is because the browser will not forward the cookie and/or authentication data to a different IP address or DNS address for security reasons. If you log in to both servers in the browser, it then fails over correctly, but that is not ideal, and the logins are lost when all instances of the browser are closed. To solve this problem, see Floating IP Addresses in the Clusters article.